📝 Key Takeaways: Master Wang’s hands-on training on NX Contour Milling Angle: How to control tool trajectory in real-world applications, avoiding excessive Depth of Cut and tool chipping. We’ll also cover Entry Points, teaching you to customize plunge locations to reduce air cuts, significantly boosting machining efficiency and tool life. These are practical skills you won’t find in textbooks!
Hello everyone, I’m Old Wang, Master Wang. In our last session, we discussed the cutting angle for face milling. This time, we’ll delve deeper into **cutting angles** in contour milling, and more critically, how to define the **entry point**. Listen up, these are practical tips you won’t find in textbooks; they determine whether your machined parts are masterpieces or scrap, and more importantly, impact your tool life and machining efficiency.
I. Contour Milling Angle: Mastering the Tool’s “Climbing” Posture
Remember when we first discussed multi-surface machining? I mentioned that the direction the tool travels—whether it’s “with the material” (climb milling) or “against the material” (conventional milling)—is a huge consideration. The cutting angle in contour milling is similar, operating on the same principle, just extended from flat surfaces to contoured ones.
1. Understanding the Essence of “Cutting Angle”
Simply put, the **cutting angle defines the direction your tool travels on a contoured surface**. It dictates whether the tool “climbs” along the surface’s slope, “cuts” across it, or “nips” at it diagonally. Don’t underestimate this direction; it directly impacts cutting forces, surface finish, chip evacuation, and even whether your workpiece deforms.

2. Automatic vs. Manual Assignment: Which is Better?
In Siemens NX, the default setting is usually **Automatic**, where the software determines the direction based on its algorithms. But listen up, the software’s “Automatic” setting isn’t always the “best” choice for your shop floor. Especially when machining complex surfaces, special materials (such as titanium alloys, high-temperature nickel-based alloys), or parts requiring extremely high surface finish, you need to manually specify the direction.
-
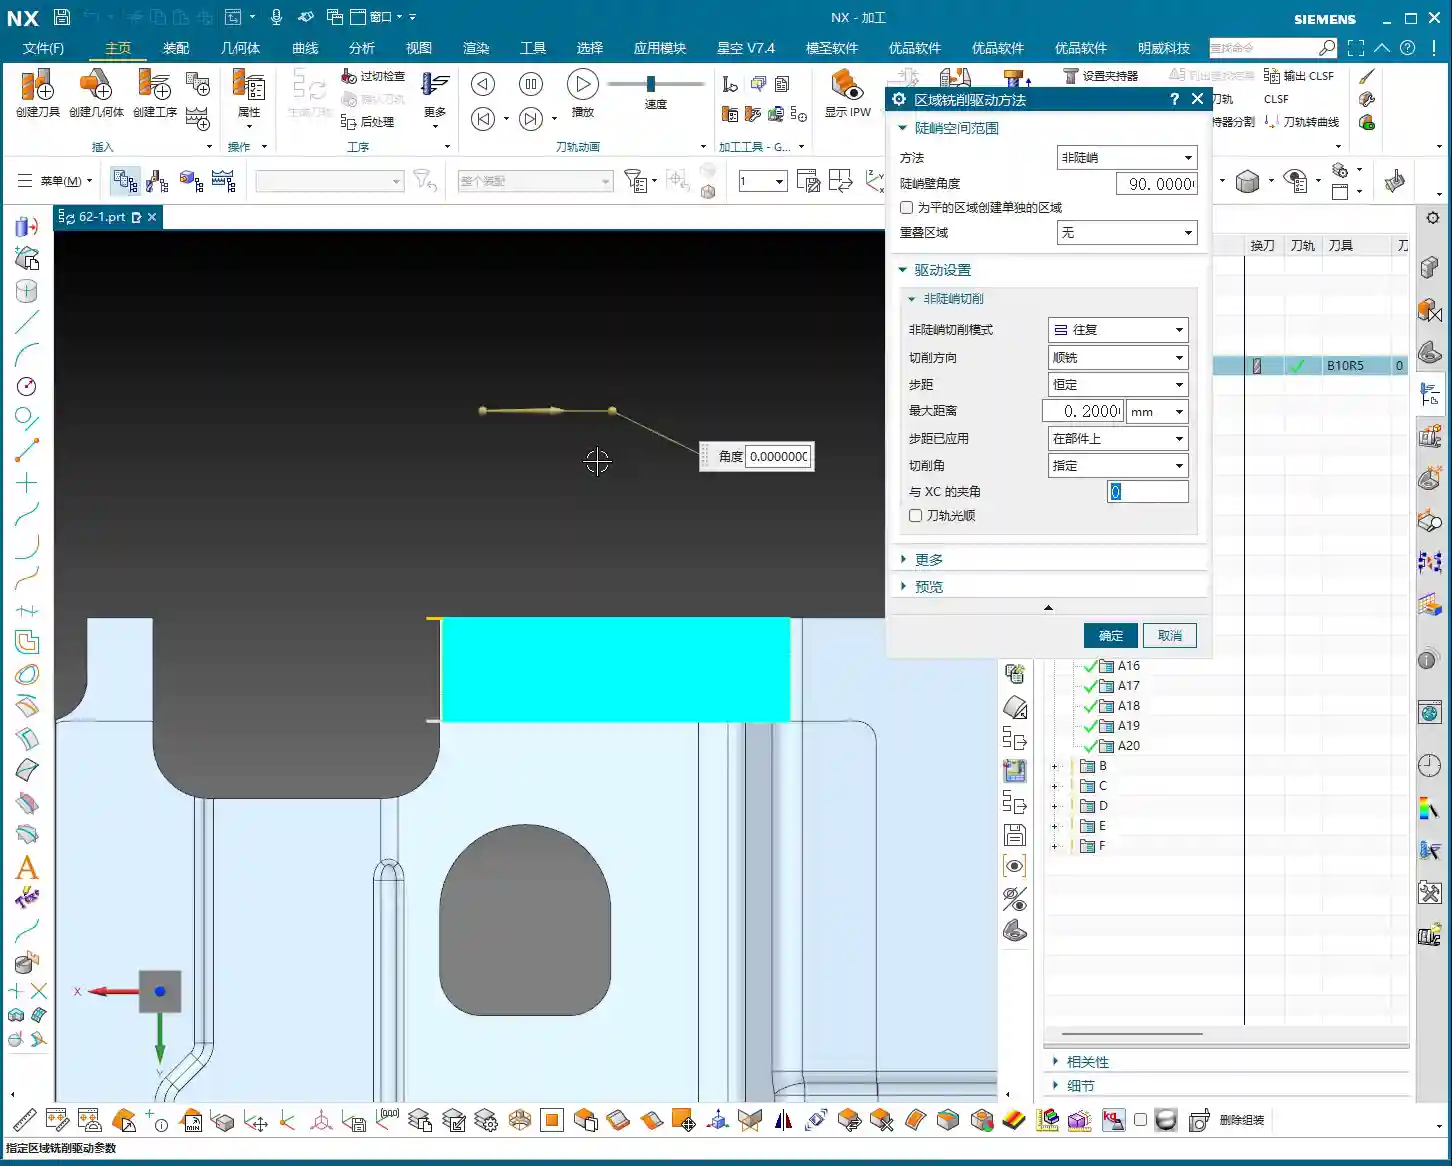
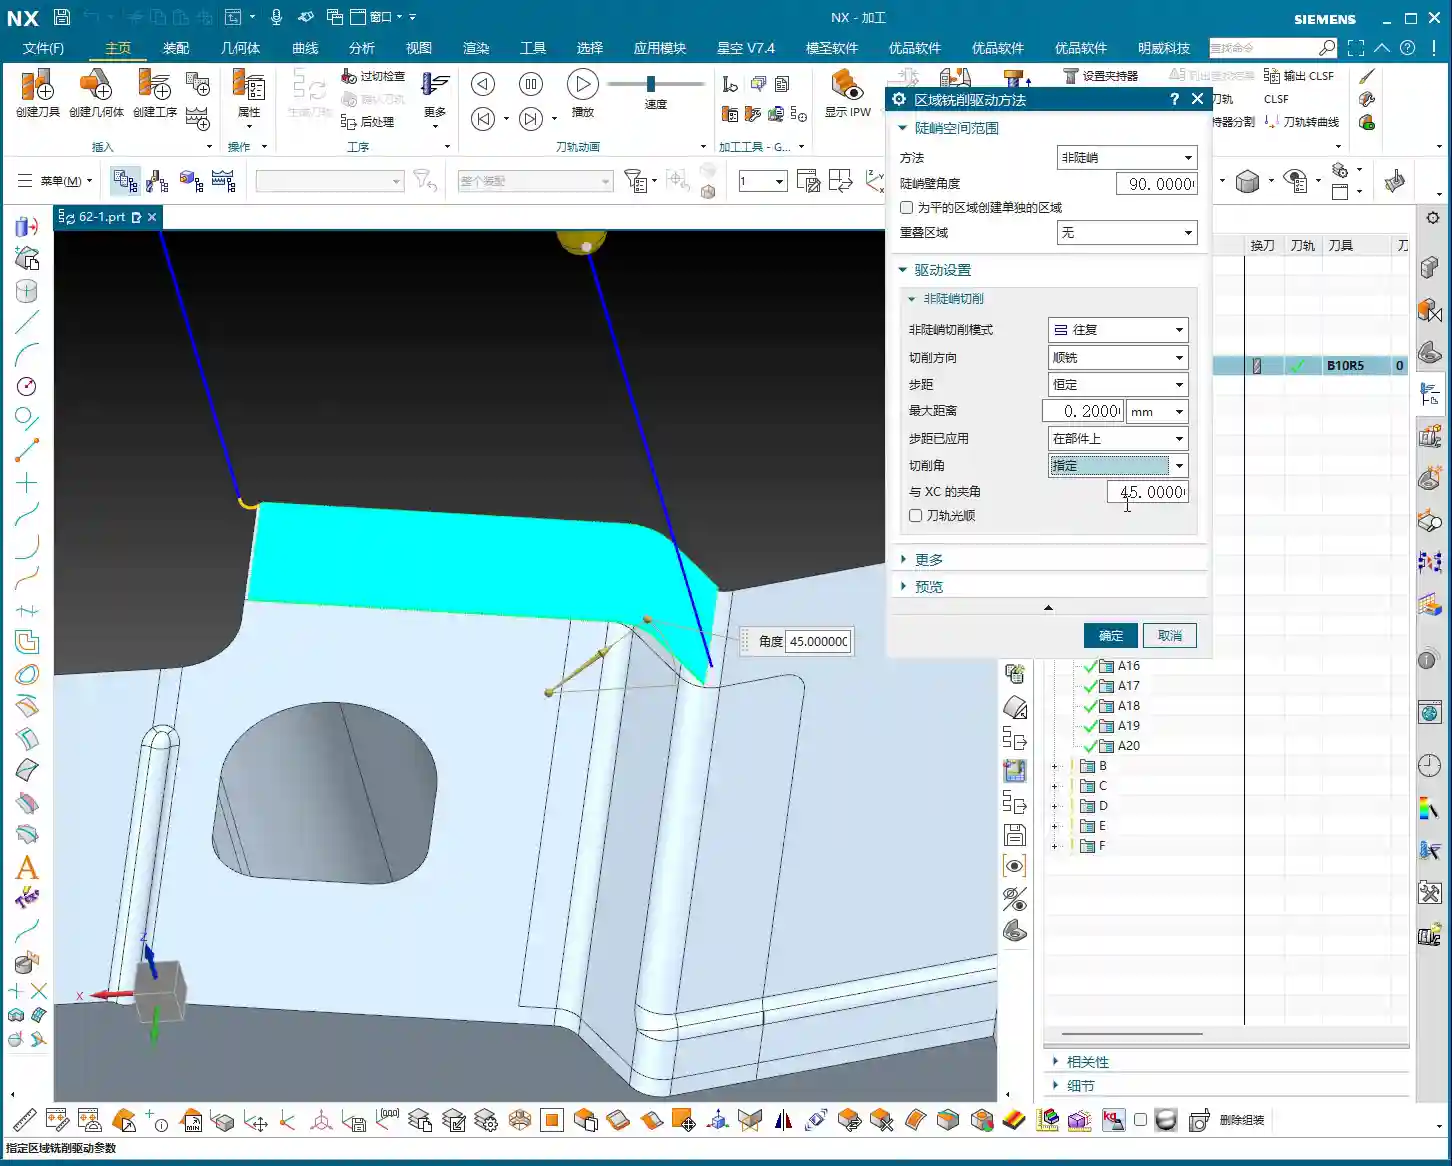
0 Degrees (Default): The tool typically moves along a primary axis (e.g., X or Y axis). On some gentle or regular surfaces, it might follow the longest edge. This method is often viable.
-
90 Degrees: This rotates the tool direction by 90 degrees. If you were originally moving along the X-axis, you now move along the Y-axis. This is particularly effective when dealing with **steep regions**. For instance, if you encounter a slope and try to traverse it (0 or 180 degrees), excessive cutting forces might lead to vibration, and even cause the tool to “dig in” (Depth of Cut issues), ruining the surface finish. In such cases, adjusting the angle to 90 degrees allows the tool to “climb” along the slope, resulting in more stable cutting, smoother chip evacuation, and significantly better results.
-
180 Degrees: The direction is opposite to 0 degrees, essentially moving along the opposite axis. This option can help achieve better climb or conventional milling effects in certain specific geometries.
-
45 Degrees: Moving diagonally. On transitional surfaces that are neither entirely gentle nor entirely steep, 45 degrees can sometimes find a balance, allowing for more even tool loading and reducing machining marks. Especially when the surface has variations in multiple directions, trying 45 degrees is a good option.
Master Wang’s Insight: Don’t just rely on software simulations; observe the cutting sparks, listen to the cutting sound, and feel the machined surface. If the sparks are excessive, the sound is harsh, or the surface is rough, chances are the cutting angle isn’t right. We’re aiming for smooth cutting, even sparks, and a stable, quiet sound. For different materials, like aluminum, you can be a bit more aggressive. But when machining tough materials like titanium alloys and high-temperature nickel-based alloys, the cutting angle requires meticulous calculation. If the angle is wrong, your tool life will be directly halved—you’re essentially burning money!

3. “Longest Edge” and “Specify Feature”
Besides directly specifying angles, Siemens NX also offers options like “Longest Edge” and “Specify Feature.”
-
Longest Edge: The system automatically identifies the longest edge in the current machining area and guides the tool along that direction. This can be convenient for regular, elongated contoured surfaces, but unexpected paths may occur on complex surfaces.
-
Specify Feature: This option is even more flexible, allowing you to directly select an edge or curve that you want the tool to follow. This is particularly useful in 5-axis machining, enabling precise control over tool axis and toolpath, preventing collisions.
Practical Tip: For a specific part, if one direction has a relatively gentle and long slope, prioritize “climbing” along that direction to achieve better surface quality and machining efficiency. However, if you encounter locally steep areas, undercuts, or sudden changes in shape, you’ll need to flexibly adjust the cutting angle, and may even need to use multi-segment cutting, with different angles for each segment.
II. Specifying the Entry Point: The Tool’s “Admission Ticket”

The entry point is where your tool first makes contact with the workpiece. Don’t think this is unimportant; a well-chosen entry point can significantly reduce air cutting time, protect the tool, and prevent unsightly “entry marks” on critical surfaces.
1. Why Customize the Entry Point?
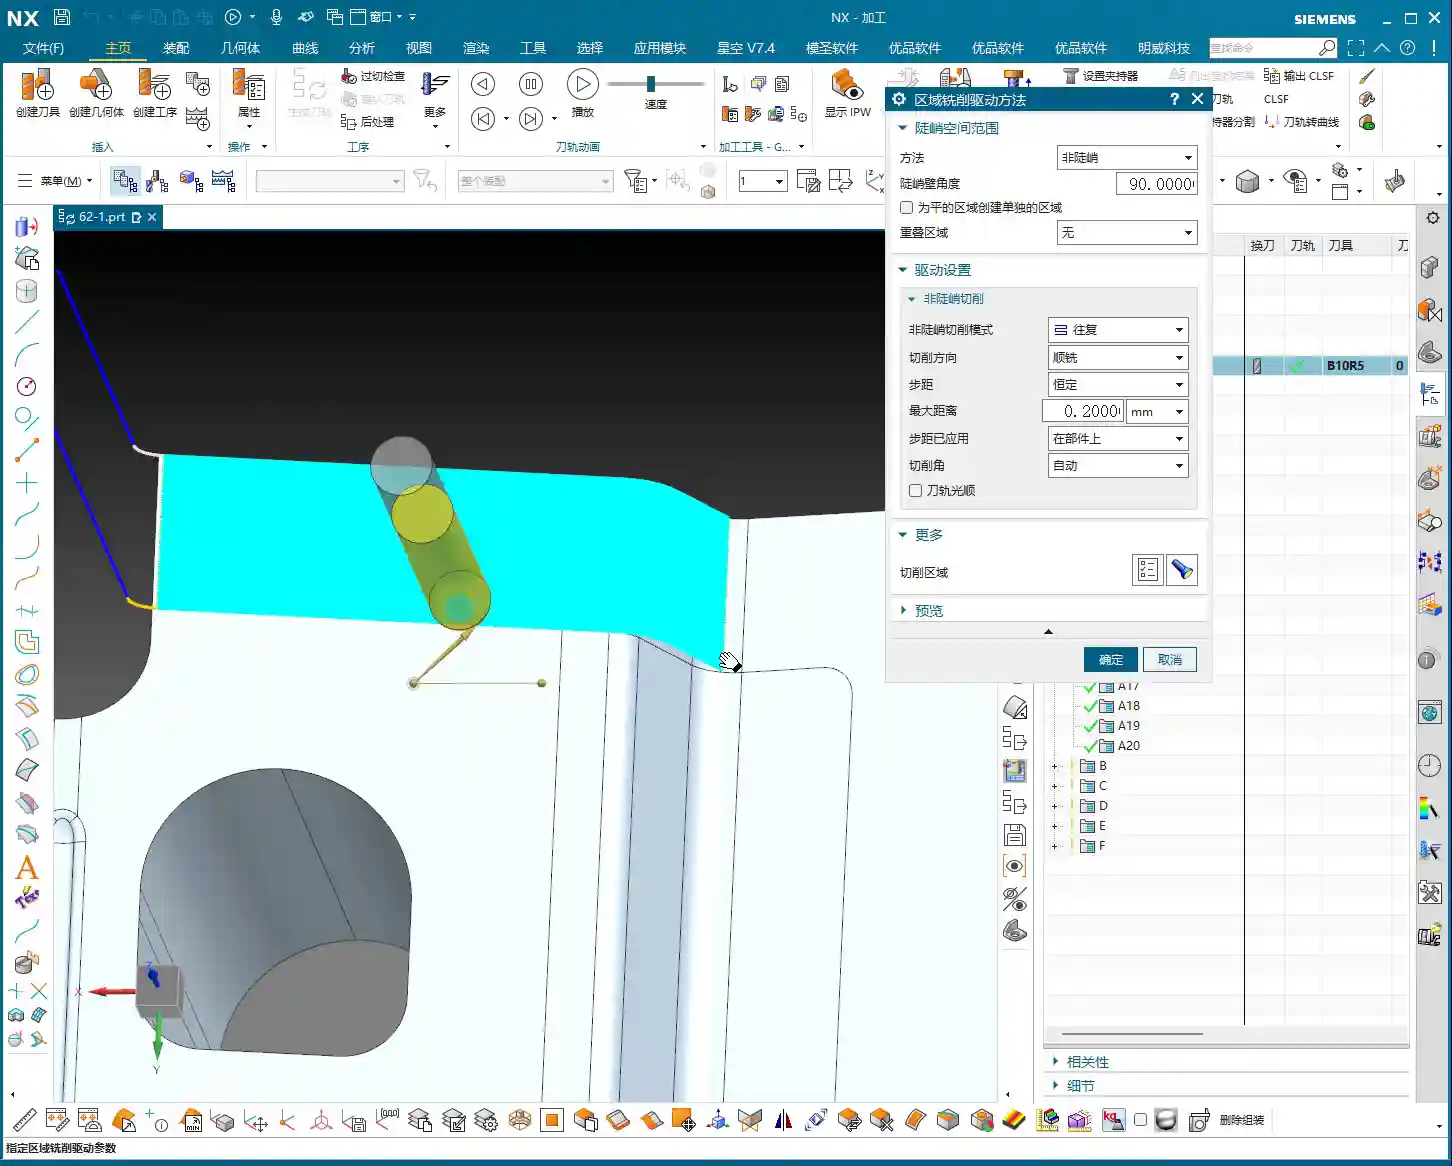
Automatic Entry: The software selects an entry point it deems “safe” based on its algorithms. However, this “safe” often means conservative, which can lead to:
- Excessive Air Cuts: The tool approaches the workpiece from a distant position, wasting time.
- High Impact: The tool plunges vertically into solid material, especially at corners, which can cause significant cutting impact, even leading to tool chipping. This is fatal, especially for hard materials and brittle tools.
- Entry Marks: Leaving initial cutting marks on the part surface, affecting surface finish.
Customized Entry Point: Listen up, when us veteran machinists train apprentices, it’s all about “precision.” Customizing the entry point allows you to precisely place the tool’s “admission ticket” at the most suitable location. This way:
- Reduced Air Cuts: The tool can enter directly from the workpiece edge or an already machined area, significantly saving idle travel.
- Avoid Impact: We can choose to plunge the tool at the workpiece’s **open edges, chamfers, or areas with thinner material**, allowing the tool to gradually engage the material, reducing impact. For example, using “Ramping” or “Helical Entry” strategies for a gentle external entry is much smoother than a vertical plunge.
- Protect Tool: Reducing impact forces naturally extends tool life and saves costs.
- Improve Surface Quality: Avoid unsightly entry marks on critical machined surfaces, ensuring high quality for the final product.

2. Operation Path in Siemens NX
In Siemens NX, navigate to your toolpath operation’s parameter settings. Typically, under the “Cutting Region” category, you’ll find an “Start Point” option. Click it, and you’ll see “Automatic” and “Custom (or Specify)” options. Select “Custom,” and then you can choose your desired entry point in the graphics area, such as a corner of the workpiece or any point on an edge.
Master Wang’s Advice: When selecting an entry point, generally prioritize:
- Away from critical feature surfaces: Avoid leaving entry marks on critical dimensioned or aesthetic surfaces.
- Areas with thinner material or easy entry: For example, the gate edge of a casting, the raw edge of a forging, or an already milled step surface.
- Sufficient clearance: Ensure the tool has enough space to clear fixtures or other obstructions before engaging the material.
- Avoid blind or sharp corners: Stress concentrates in these areas, and direct tool entry can easily lead to tool chipping.
Cost and Efficiency: In CNC machining, the ultimate goal is to reduce costs and improve efficiency. Every air cut, every prematurely scrapped tool, is a cost. Learning to flexibly apply cutting angles and entry points is a critical step from being a regular operator to an advanced technician. Especially when machining high-value, high-precision parts, these details determine success or failure.
Summary: Pitfall Avoidance Guide
1. Cutting Angle is Not a Panacea: There’s no one-size-fits-all cutting angle. You must adjust flexibly based on different workpiece geometries, material characteristics, and machining requirements. Don’t stick to a single angle; experiment and observe more.
2. Blindly Trusting “Automatic” is a Taboo: Siemens NX’s automatic functions are for convenience, but they are not always the optimal solution. Especially in finishing passes and high-difficulty machining, you must manually optimize the cutting angle and entry point.
3. Entry Point Isn’t Always Closer-is-Better: While reducing air cuts is important, the entry point must also have sufficient safety clearance to avoid interference with fixtures or other obstacles.
4. Consider Tool Characteristics: Different tools (e.g., ball end mills, flat end mills, bull nose end mills) have varying sensitivities to cutting angles and entry points. Carbide tools are more susceptible to impact, while high-speed steel tools are relatively impact-resistant but have shorter lifespans.
5. Practice Makes Perfect: All theoretical knowledge must ultimately be verified through machine shop practice. Observe machine operating status, tool wear, record data, and build your own experience database. This is the true hard skill that will establish your credibility on the shop floor.
6. Promote Your “Secrets”: Once you’ve accumulated this practical experience, organize it into standardized machining solutions. This itself is a valuable asset for your company. When promoting your services externally, highlight advantages such as “providing optimized 5-axis toolpaths for complex surfaces” and “effectively controlling tool wear for high-hardness materials” to effectively attract clients who demand high precision and efficiency.
👤 About the Author:
The author is a veteran CNC machining professional with 15 years of industry experience, specializing in UG NX programming. This article is an original work representing personal practical insights.
⚠️ Copyright Notice: Unauthorized reproduction or distribution without prior communication is strictly prohibited.