📝 Key Takeaways: Master Wang provides a hands-on guide to hardcore Siemens NX thread milling. Starting with an M26x1.5 fine pitch thread case study, this guide details tool creation, parameter settings, multi-pass cutting techniques, and the advantages of climb milling. It also reveals exclusive tips for troubleshooting NX program errors and achieving precision control, helping you move beyond textbook knowledge to tackle real-world machining challenges and produce high-accuracy threaded parts.
Hello everyone, I’m Master Wang. Today, we’re diving into something hardcore: the final piece of 2D machining, and a common stumbling block for many novices—thread milling.
Listen up. If you’ve mastered the commonly used commands we’ve covered, what I’m going to explain today will be much easier to grasp. We’ll save the less common ones for later, once your fundamentals are solid; otherwise, it’ll be pointless.
Thread Milling Tool Creation and Parameter Setup
Let’s get straight to it. What are we doing? Thread milling! In NX, select “Thread Milling” and confirm.
Why Choose Thread Milling?
Many newcomers get confused when they see “Thread Milling.” But in essence, it follows the same principles as Hole Milling, with a similarity of up to 90%. Don’t let the name intimidate you; as long as you’ve mastered the tricks for hole milling, you’ll quickly pick up thread milling. It simply focuses more on the unique geometry and machining requirements of threads.
Today, let’s discuss a real-world job: an M26×1.5 fine pitch thread, with an actual outer diameter of 24.5mm. This isn’t just a random example; it’s an actual production task.
Thread Milling Cutter Selection and Naming
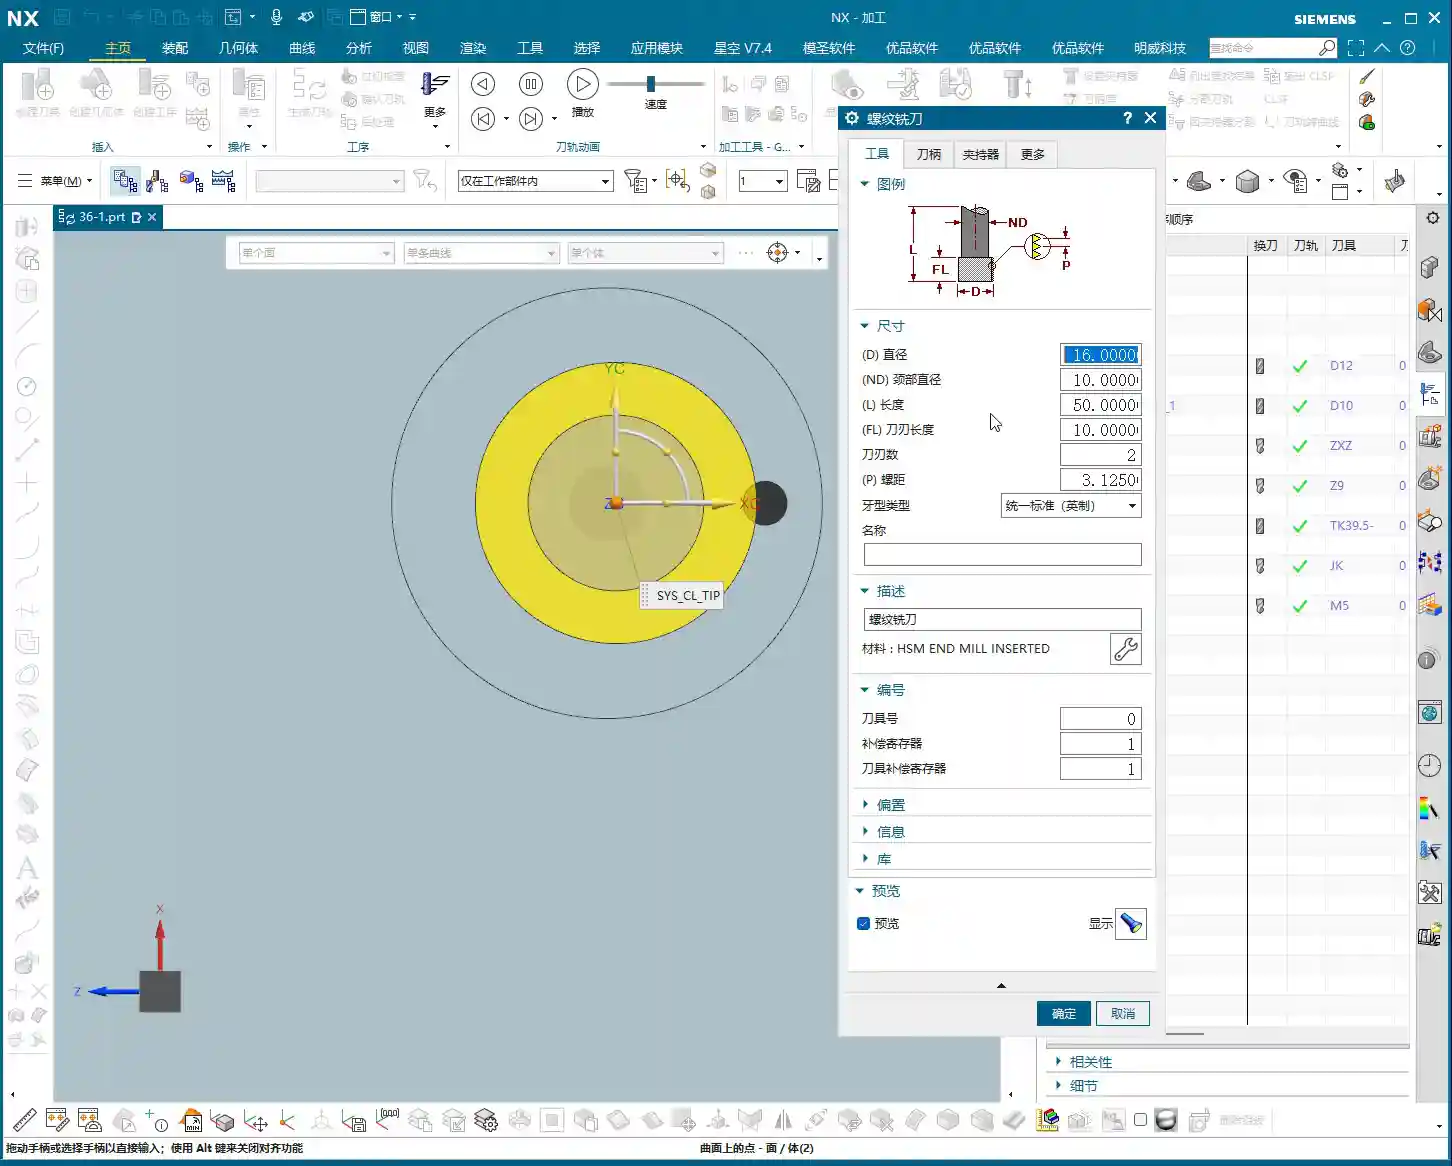
The first step is to create the tool. Here’s a pitfall: NX templates typically do not include thread milling cutters. Don’t waste your time looking for one there. Instead, switch to “System” and find “Thread Mill.”
Once created, the naming must be standardized. Listen up: just name it M26×1.5. It’s simple and clear; at a glance, you’ll know exactly what it’s for, saving you from any confusion.

Optimal Tool Diameter and Pitch Combination
For the tool diameter, we can choose 16 mm. Why 16? Look, for an M26 thread using a 16 mm tool, there’s about a 3 mm gap between the inner and outer diameters. This clearance is perfectly sufficient for an M26×1.5 thread. This is practical experience; textbooks might not teach you this calculation.
Next is the core parameter: pitch. As we mentioned at the start, this is an M26×1.5 thread, so the pitch here must be 1.5. Dare to enter one wrong digit, and you’ll produce scrap—don’t say I didn’t warn you!
You can ignore the number of tool flutes for now; it looks pretty much like a T-slot cutter, nothing special.
Precise Thread Profile and Length Settings
Regarding the thread profile type, listen up: it must be metric! If you dare to select inch, the resulting thread will be scrap and won’t match the actual product. Leave other parameters alone for now; the most critical one is the pitch, you must ensure it is absolutely correct.
For the tool length, we generally don’t need to be overly precise; just ensure it’s sufficient for normal machining. The key, I’ll emphasize again, is the pitch, which must be 1.5. Once the tool is created, you’ll have a thread milling cutter that resembles a T-slot cutter.
Thread Milling Process Flow and Parameter Optimization
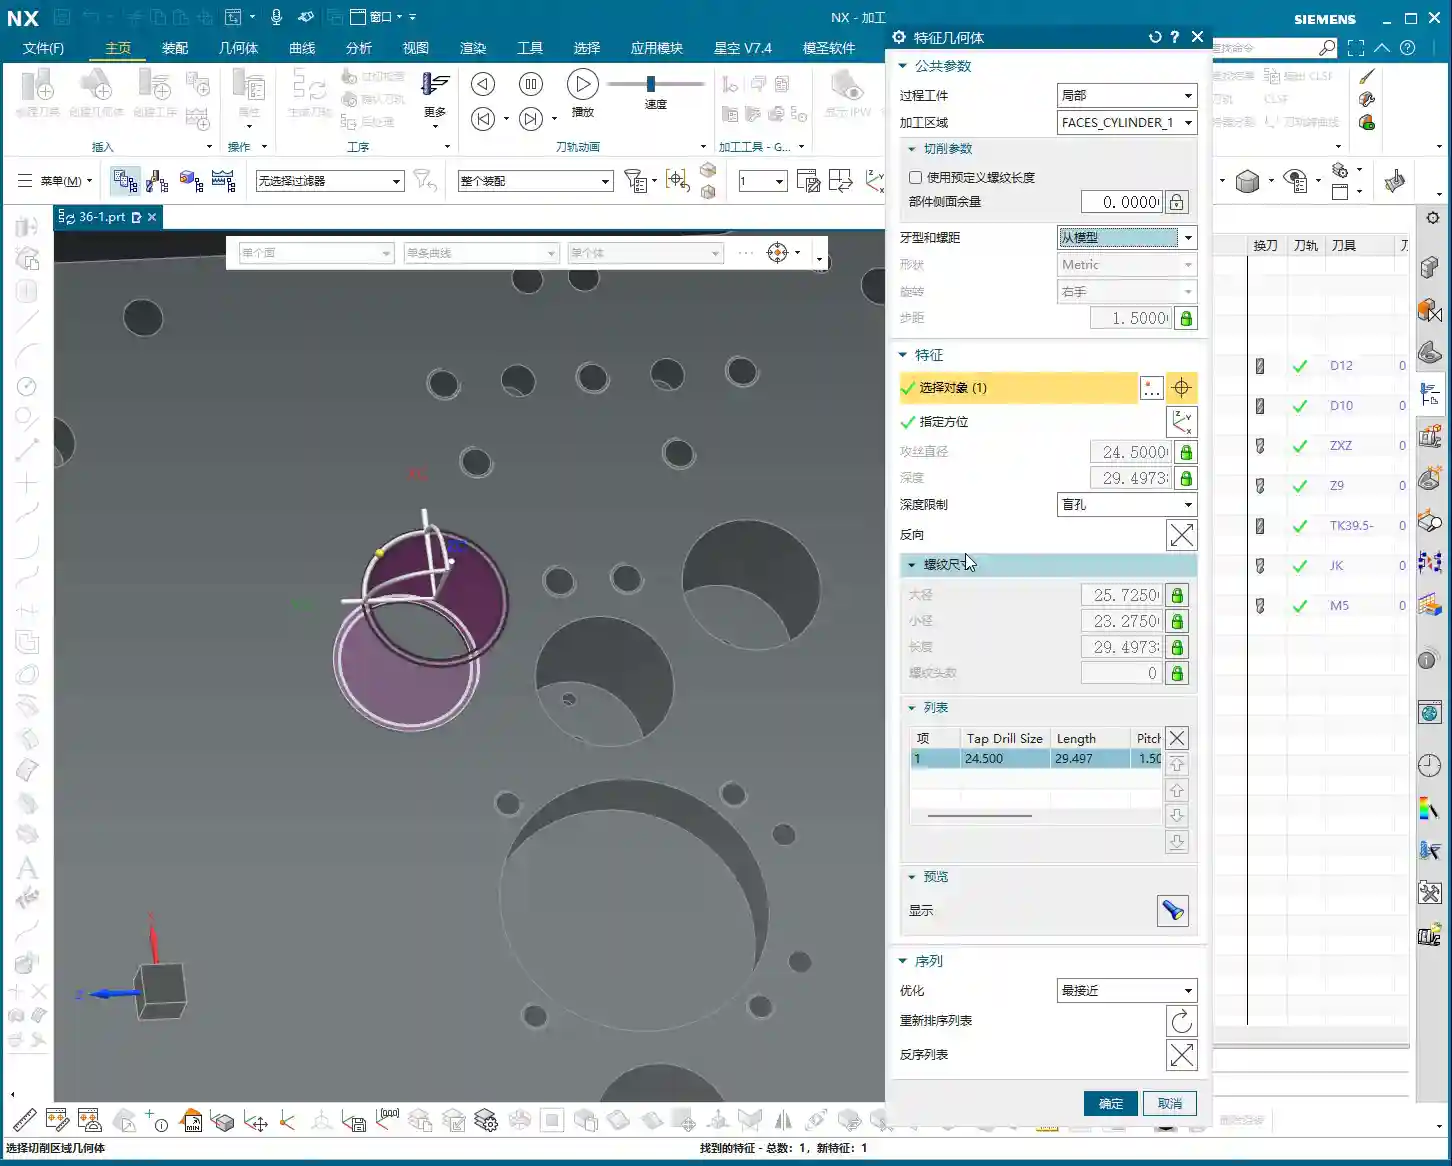
Now that we have the tool, it’s time for the program. For geometry selection, simply select the hole you want to thread mill, just like with hole milling.

Geometry Selection and Thread Size Recognition
For setting thread dimensions, here’s a shortcut: don’t choose “from table.” Those are theoretical data and too rigid. Instead, select “from model.” NX will automatically determine the major diameter of the thread, saving you the trouble of manual measurement and providing greater accuracy.
This differs slightly from hole milling. Thread dimensions are critical.

Empirical Values for Major Diameter, Minor Diameter, and Machining Depth
Listen carefully: for the major diameter here, we need to manually adjust it to 26. NX’s automatic recognition might not be accurate. The minor diameter is 24.5.
Here’s the crucial point: for the thread length (depth), we cannot mill directly to the exact required depth. A thread milling cutter is not a drill; it cannot cut to full depth in one pass! The thread cutter is prone to heavy cutting and chipping at the bottom, so always leave an allowance. For instance, if we need to mill 25 mm deep, we’ll set the actual machining depth to 25, but you must remember that this 25 mm is where the tool finally reaches, and the actual effective thread depth might only be 23 mm. This gives the tool some breathing room and helps ensure thread quality. Remember, it’s better to cut a little shallow than to ruin the tool by going full depth.
Multi-Pass Cutting: The Secret Weapon for Roughing
For feed rate properties, just set it to 100% and don’t worry about it.
Now, let’s look at a very important parameter: Max stepover distance. What does this mean? This is the essence of multi-pass cutting during roughing! If you set it to 0.2, it means the tool will take a 0.2 mm radial cut per side per revolution. Since it’s thread milling, the tool completes a full revolution around the thread, so the actual material removed per pass is 0.4 mm (0.2 mm per side × 2). Consider that an M26×1.5 thread has a pitch of 1.5 mm; if you don’t use multi-pass cutting, one single pass will ruin it! Especially for raw blanks, multi-pass cutting is essential. Take small bites; don’t try to hog it all at once! This is a golden rule for protecting your tools and ensuring machining quality.
Climb Milling: The Preferred Direction for Thread Machining
In the cutting parameters, why should you choose climb milling? Listen up! When thread milling, we almost always use climb milling, moving from top to bottom. Conventional milling isn’t necessarily wrong, but it cuts from bottom to top, which can lead to chatter, faster tool wear, and a poor surface finish. My experience dictates: choose climb milling, cutting from top to bottom! This ensures stable cutting, longer tool life, and high-quality threads. When you set up your NX templates, you should make this the default setting to establish good habits.

Tool Path Extension and Material Allowance Management
Regarding tool path extension, it’s similar to hole milling: top extension, bottom extension, adjust according to actual conditions, generally without major changes. Allowance control is also simple: roughing must leave an allowance, for example, 0.5 mm. For finishing, set the allowance to zero to cleanly machine the thread.
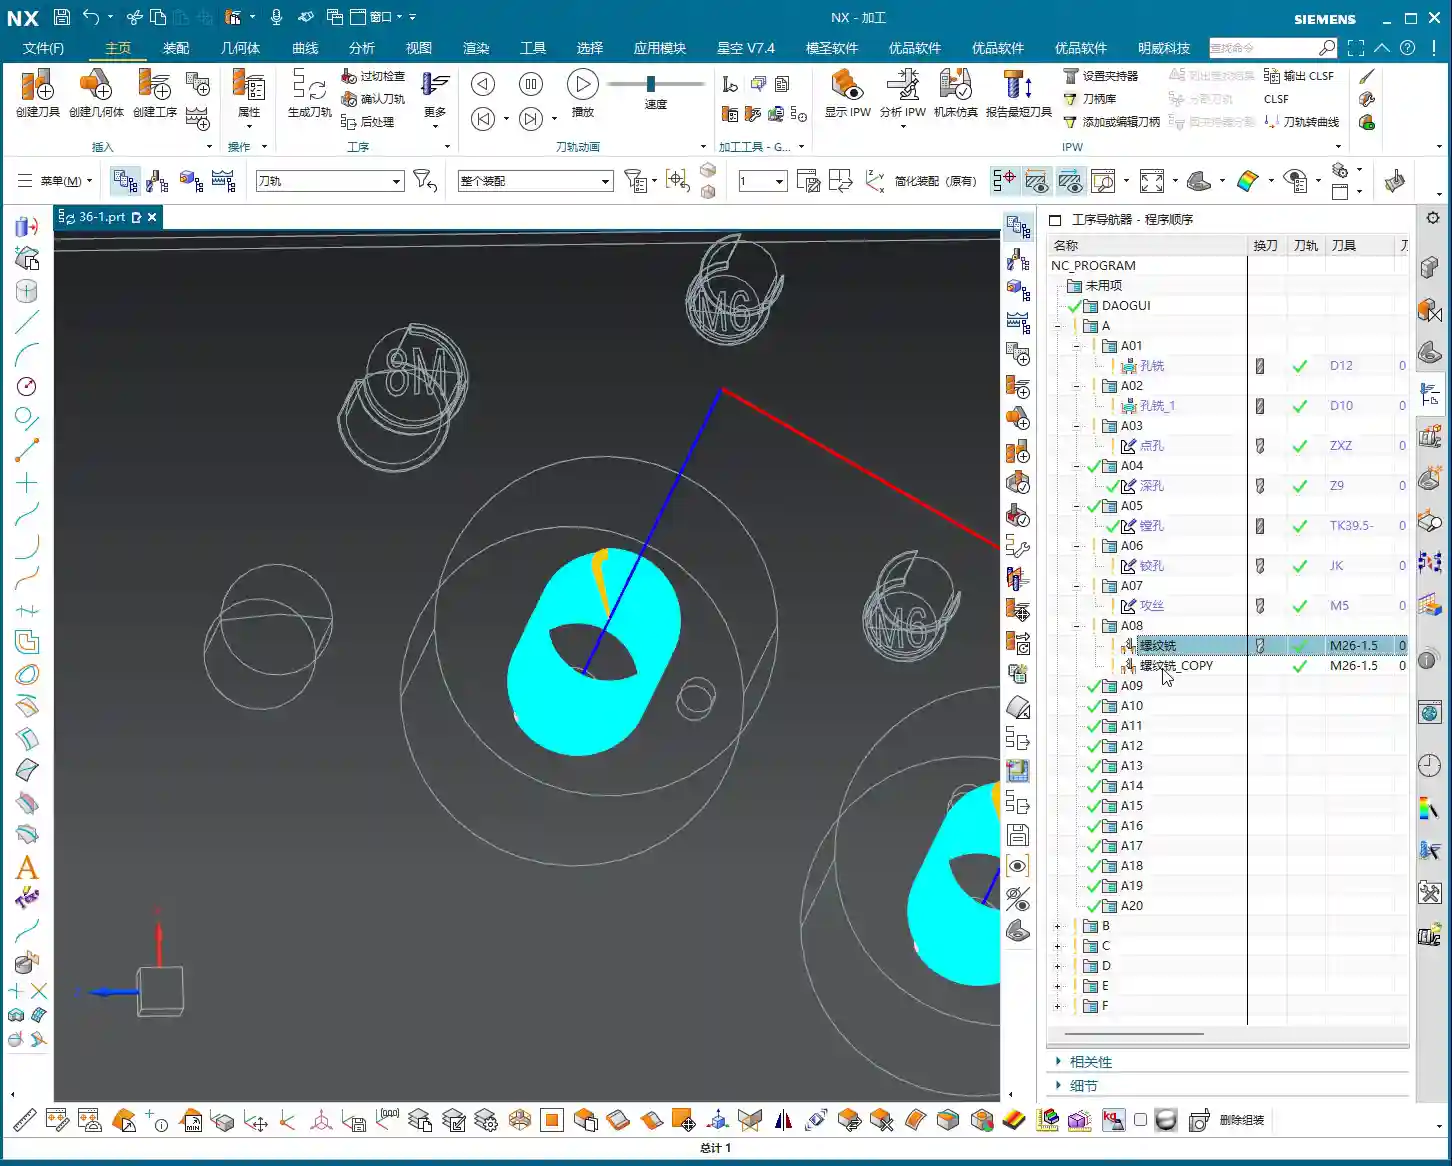
Program Duplication and Common Issue Resolution
Once the roughing program is done, how do you handle finishing? The easiest method is to copy and paste, then modify the parameters. For finishing, change the allowance to 0. But there’s a pitfall here, listen up!
Pitfalls of Program Duplication and Correction
After you duplicate a program, the tool path generated for the new program sometimes still reflects the old one. Strange, right? This is a minor quirk in NX. The correct approach is to: first click on the old program above it to deselect it, then click on the new finishing program. Only then will it truly refresh the tool path. Otherwise, you might think you’ve changed the parameters, but the tool path remains the old one, and all your efforts will be wasted! Don’t be fooled by the software’s illusion; this can lead to major problems during actual machining.
Regarding cutting passes here, for roughing, we typically use “no cutter compensation” or “cutter compensation” strategies to enable multi-pass cutting. For finishing, this isn’t necessary; just go for a single pass to final size.

Practical Application of Thread Go/No-Go Gages
Remember this: After machining a thread, you must use thread Go/No-Go gages! Don’t expect to machine it to final size in one pass; that’s wishful thinking! Especially for roughing, first leave some allowance. For example, use the Go gage to check if it fits. If it doesn’t, mill a tiny bit more. If it’s too large, it’s scrap and you’ll have to start over! Never rush; take your time. Ensuring accuracy is the top priority.
Solution for ‘Red’ NX Programs
Finally, let me teach you about a minor quirk in NX, especially in operations like hole milling and thread milling: your program keeps turning red, isn’t that annoying? That indicates it needs approval. Don’t panic! Simply right-click on the red program, select “Object,” then click “Approve”, and it will no longer be red! This is just how the software behaves; you need to work with it, don’t fight it, or it will just keep showing you red.
Summary: Pitfall Avoidance Guide
- Standardize Tool Naming: Name tools by thread specification (e.g., M26x1.5) for clarity.
- Pitch is Key: Whether for the tool or the thread dimensions, the pitch must match the actual requirements; otherwise, the thread will be scrap.
- Metric Priority: The thread profile type must be metric. Do not select inch, or it will be scrap.
- Leave Allowance for Depth: A thread milling cutter cannot cut to full depth in one pass. The machining depth should be slightly shallower than the actual thread depth to prevent heavy cutting and chipping at the bottom.
- Multi-Pass Roughing: Utilize the “Max stepover distance” parameter for multi-pass cutting to protect the tool and enhance machining stability, especially for raw blanks.
- Prefer Climb Milling: Thread milling typically uses climb milling (from top to bottom) to reduce chatter and ensure surface quality and tool life.
- Exercise Caution When Duplicating Programs: After duplicating a program, you must first deselect the old program, then select the new program and regenerate the tool path to ensure parameter updates take effect.
- Go/No-Go Gages are Paramount: After thread machining, you must use thread Go/No-Go gages for inspection. Do not blindly trust the program, especially for roughing, leave an allowance for trial cuts before finishing.
- Don’t Panic if Program Turns Red: Right-click “Object” -> “Approve” to resolve the minor quirk of NX programs turning red.
👤 About the Author:
The author is a veteran CNC machining professional with 15 years of industry experience, specializing in UG NX programming. This article is an original work representing personal practical insights.
⚠️ Copyright Notice: Unauthorized reproduction or distribution without prior communication is strictly prohibited.