📝 Key Takeaways: Master Wang shares practical techniques for UG NX 1980 Floor-Wall Milling, from coordinate system setup to core function analysis, revealing efficient bottom and side wall machining methods, emphasizing flexible application and real-world experience.
Hello everyone, I’m Master Wang. Today, let’s talk about an old friend in UG NX: Floor-Wall Milling. This function might sound complicated in textbooks, but in our actual work, it’s a Tier 0-level powerhouse. Using it correctly can save you a lot of trouble.
I. Pre-Programming: Creating and Applying the Work Coordinate System (WCS)
Listen up! The first step in programming is to handle your geometric properties, which means setting up your Work Coordinate System (WCS). Don’t think it’s simple and overlook it; it’s your foundation!
1. WCS Creation and Movement
Let’s create a WCS and move it to the center of our machining. The method is simple:
- Click on WCS and set it in the center.
- Select point A to confirm.
We’ve covered this step before. It’s to ensure the program starts correctly. For one workpiece, we usually only need one primary WCS; others are just auxiliary. While you can create countless WCSs, in practice, we typically use only one as the main reference.
II. Floor-Wall Milling: Core Function Analysis
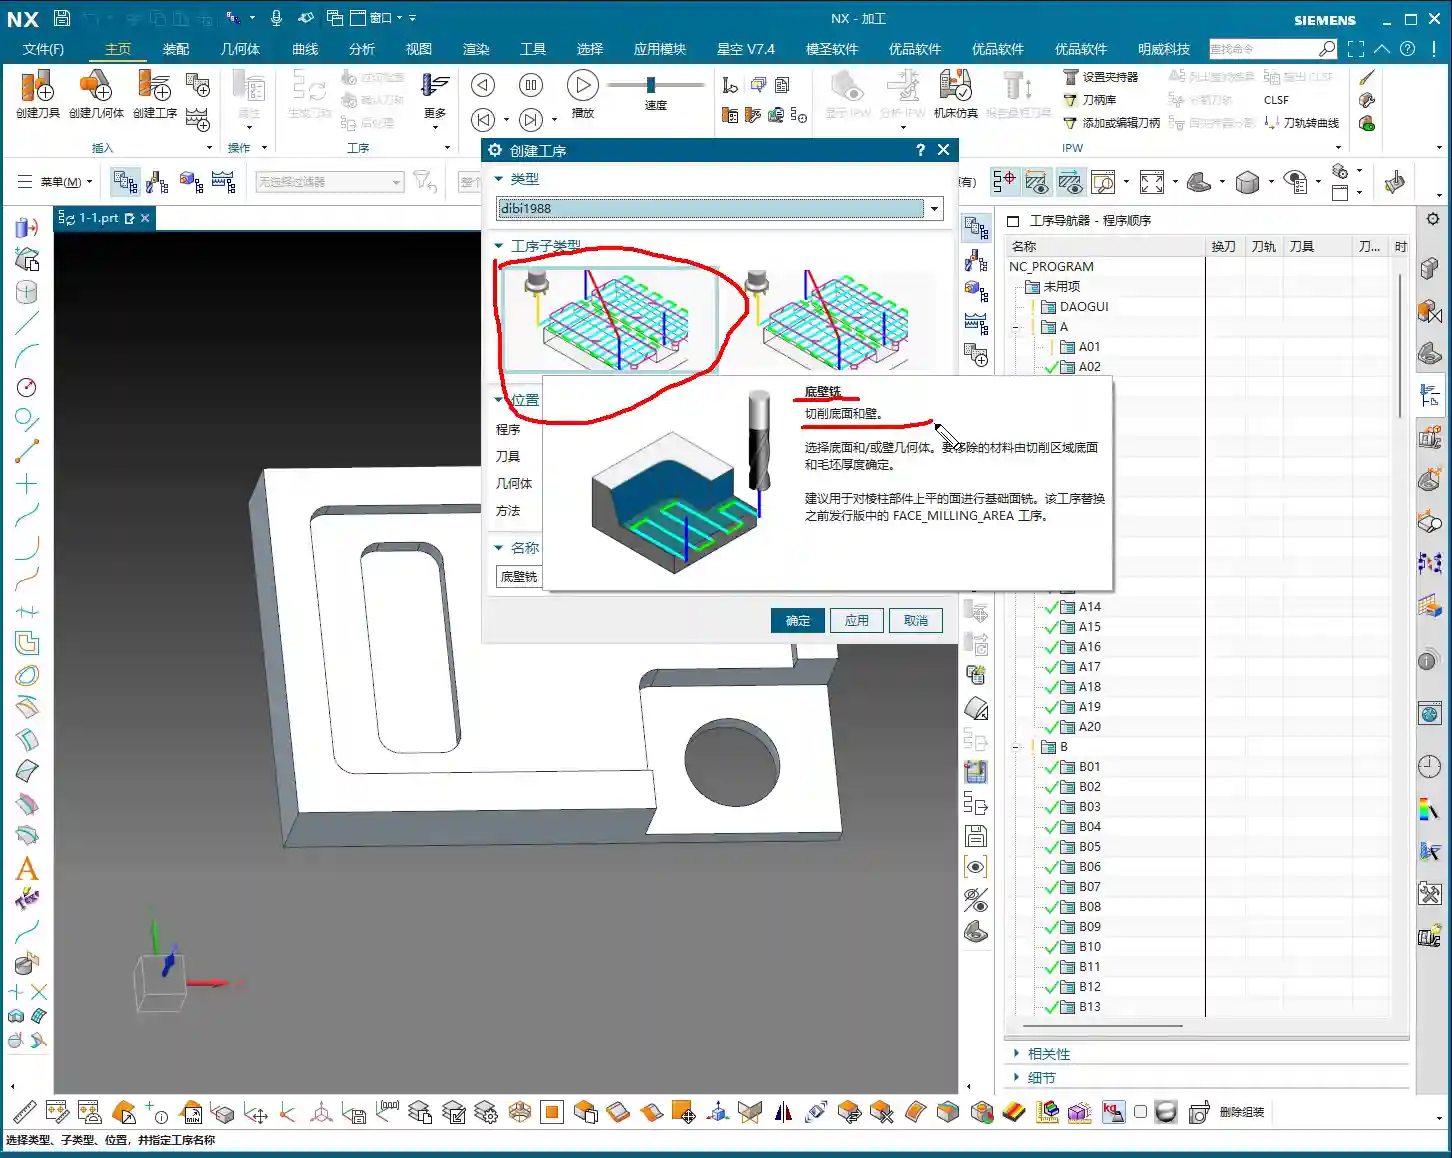
Now, let’s get to the main topic. In UG NX 1980, right-click and select “Insert Operation”, then find our Floor-Wall Milling, which usually comes with a specific template, like “Floor-Wall 1988”.
1. The Essence of Floor-Wall Milling: Efficiently Machining Floors and Walls
Floor-Wall Milling, as the name suggests, is specifically designed to cut the floor and side walls of a workpiece. It can remove material, and the cutting area, corner radius, and blank thickness can all be precisely defined. Its Tier 0 status comes from its extensive use in 2D machining, offering high efficiency and excellent results.
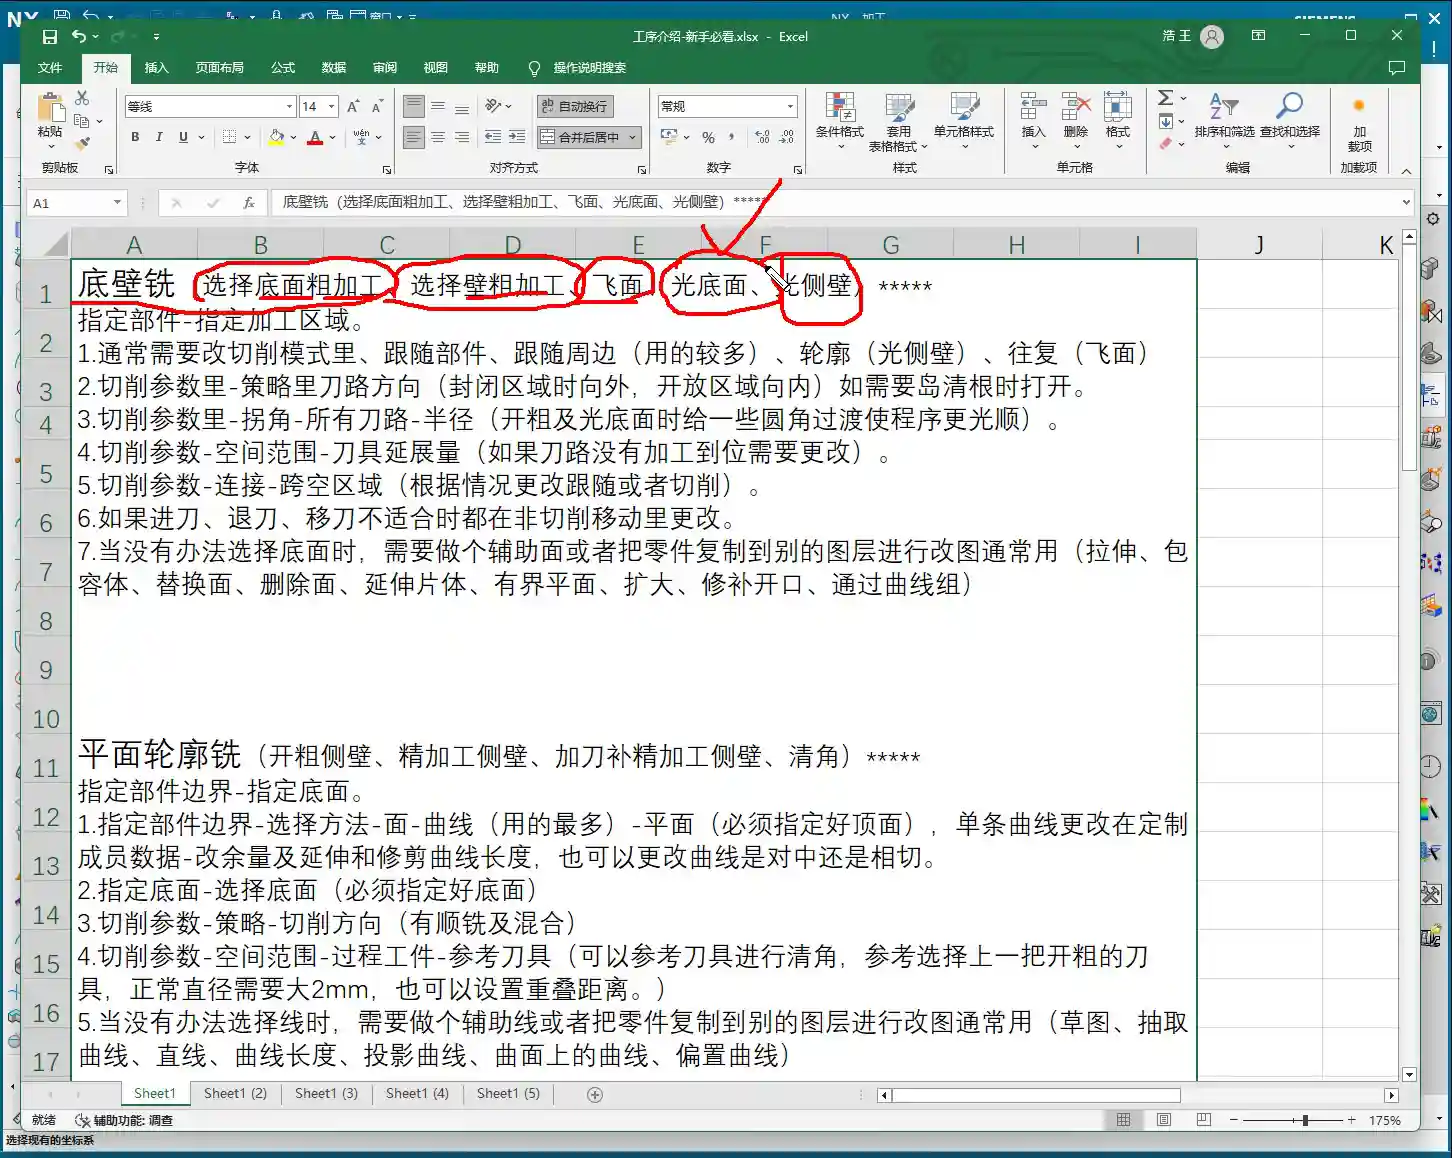
2. Overview of Main Machining Modes
This command can do a lot! I’ve put together a table for you, which I’ll upload to the 3-axis course later. It mainly includes:
- Roughing Floor: Quickly removes a large amount of material from the floor.
- Roughing Wall: Quickly removes a large amount of material from the side walls.
- Face Milling: Used for planar machining; highly efficient.
- Finishing Floor: Performs a finishing pass on the floor to meet surface finish requirements.
- Finishing Wall: Performs a finishing pass on the side walls, similar to finishing the floor.
Don’t just look at software simulations; watch the cutting sparks! These are the most common and proficient functions of Floor-Wall Milling.
III. Programming Mindset: Flexible Application, Not Rigid Adherence
Although Floor-Wall Milling is powerful and can even perform corner cleanup, deburring, and chamfering, we can’t use one command for everything. Programming requires flexibility; don’t just follow blindly.
1. Choose the Right Tool for the Job
In my opinion, Floor-Wall Milling excels and should primarily be used for Face Milling, Finishing Floor, and Roughing Floor. Other functions like Finishing Wall, while possible, might be better handled by more specialized commands like Planar Milling in the future, potentially yielding better results.
This isn’t like what some online sources claim, that it can handle nine or ten different machining methods. Those fancy methods are rarely used. We need to leverage its strengths to maximize efficiency.
2. Adapt to Actual Conditions, Don’t Memorize Blindly
Programming is dynamic, not static! If you program a part today based on my instructions, tomorrow you might find that the parameters are off when you switch to a different workpiece or machine, and the program won’t run. This is perfectly normal!

You must understand why each parameter and command is chosen, not just that it must be chosen this way. When you encounter practical problems, you need to analyze and adjust yourself. Even creating auxiliary bodies (like extended faces) to work with commands is perfectly acceptable.
IV. UG NX Toolpath Type Classification (2D and 3D)
Finally, let me briefly categorize UG NX toolpaths, which will help you understand where Floor-Wall Milling fits into the overall system.
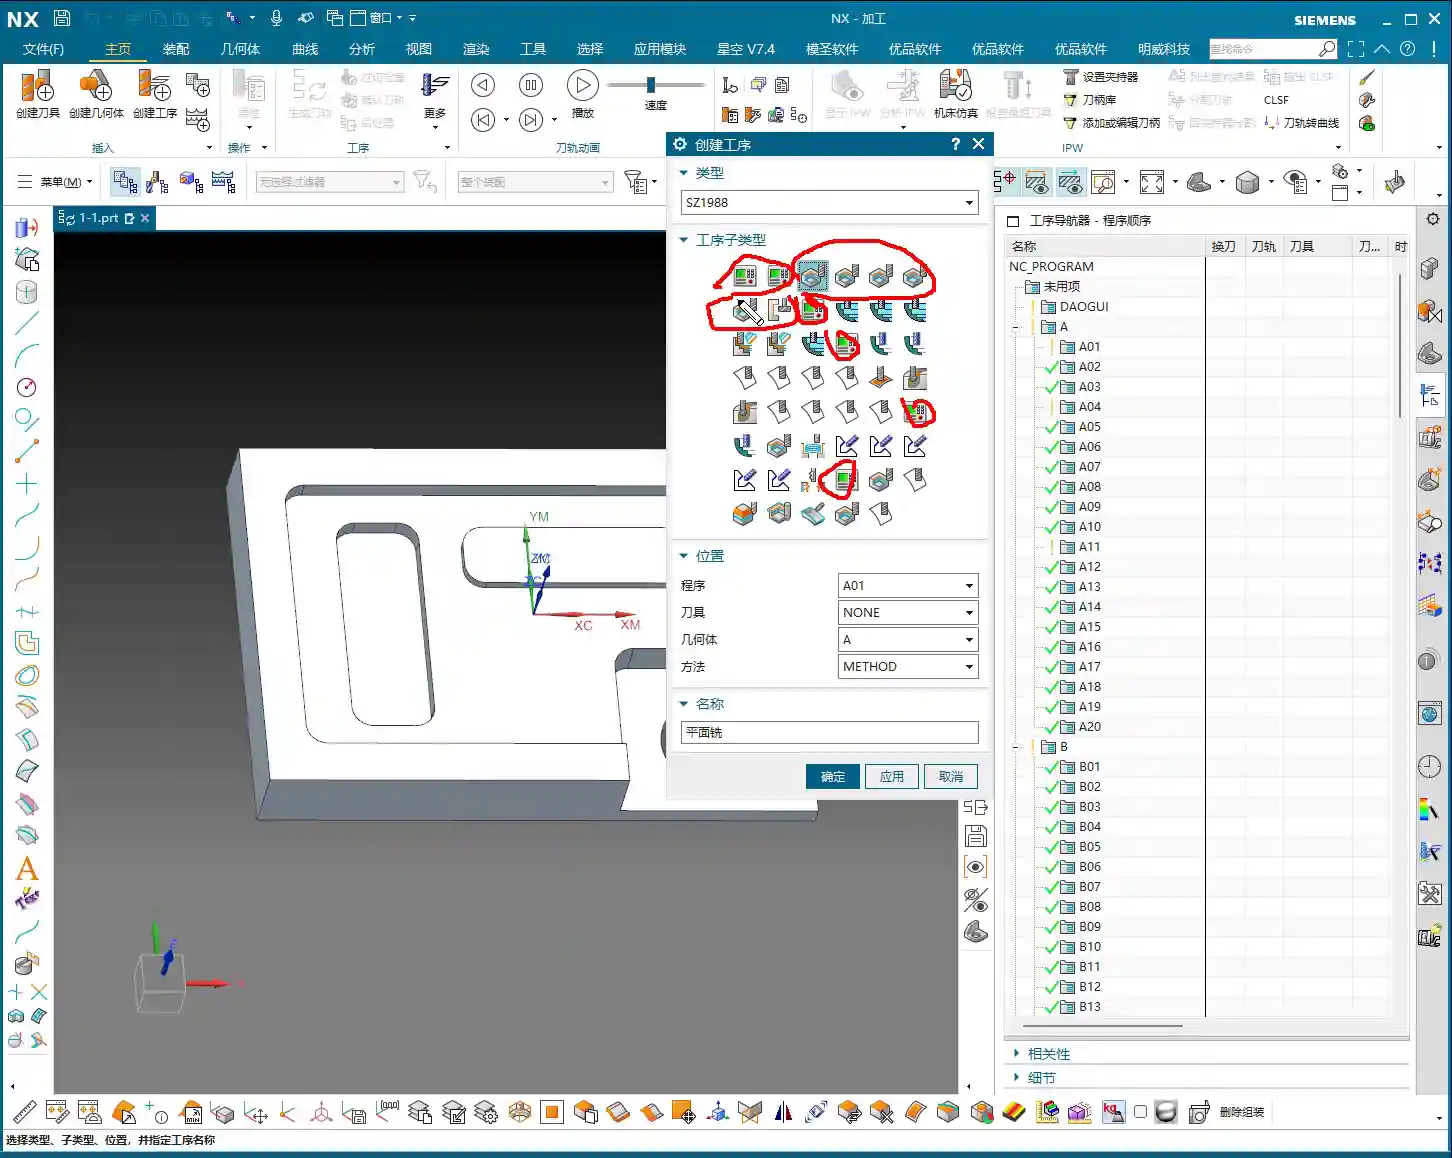
1. 2D Toolpaths: Green Indicators, Basic and Common
Operations like Floor-Wall Milling and Face Milling, which we discussed today, are typically marked in green in the Operation Navigator. They belong to 2D toolpaths, the most basic and common types used in our daily machining operations.
2. 3D Toolpaths: Advanced and Complex, Finishing Powerhouses
Further down the list, from fixed-axis surface milling to some advanced finishing functions, these are usually marked in blue or other colors. These belong to 3D toolpaths and are primarily used for finishing complex surfaces or specific shapes, such as operations related to holes, chamfers, and engraving.
Remember, these classifications are mainly for convenience in understanding and searching; essentially, they all serve the purpose of machining the part. Don’t let these fancy classifications limit your thinking.
Summary: Pitfall Avoidance Guide
As the saying goes, “The master leads you to the door, but you must walk the path yourself.” When it comes to programming, the biggest pitfall is rote memorization. What I, Master Wang, have taught today is meant to give you a practical approach, so you can avoid detours in your future programming endeavors.
The core points are three-fold:
- The coordinate system must be precise; it’s the foundation for all machining.
- Floor-Wall Milling should be used where it excels, especially for roughing and finishing floors and walls, as well as face milling for planar surfaces.
- Always maintain a flexible programming mindset. Adjust parameters based on the actual part geometry, material properties, and machine accuracy, rather than rigidly adhering to fixed settings. When problems arise, think “why” it happened, instead of complaining “why isn’t it working?”
In the next lesson, we’ll delve deeper into some advanced applications and special handling methods for Floor-Wall Milling. Thanks for watching, and see you next time!