📝 Key Takeaways: Master Wang guides you step-by-step through the entire Siemens NX roughing programming process for 24 aluminum parts on a single plate! From part analysis, blank setup, and tool selection, to toolpath optimization, depth control, flip-side machining, and auxiliary processes – every step is packed with practical insights. Plus, Master Wang’s exclusive “Pitfall Avoidance Guide” to help you boost efficiency, ensure accuracy, and turn theoretical knowledge into tangible results!
[VIDEO_HERE]
Part Analysis and Process Planning: Think Before You Cut
Part Characteristics and Machining Challenges: Never Fight Unprepared
Listen up. The job we’re discussing today involves 24 identical parts arranged on a single plate. For this type of “one-to-many” production, efficiency and consistency are paramount. Looking at the drawing, the part has a regular external shape, but it features deep pockets, chamfers, and radii, and requires machining on both sides. Don’t let it fool you, even though it’s an aluminum part, you still need to pay close attention during machining, especially for high-volume production like this. Even a small error can lead to an entire batch being scrapped.
Overall Machining Approach: Rough First, Finish Later, Multi-Sided Operation
For parts requiring two-sided machining, Master Wang’s experience dictates: machine one side to the specified plane, then flip the part and machine the other side.
1. **First-Side Roughing:** First, remove the bulk of the material from this side, leaving sufficient stock. Crucially, don’t machine all the way through; you need to leave a datum for subsequent clamping and machining on the reverse side. This plate is approximately 800 mm long and 400 mm wide, holding 24 parts, so toolpath planning must prioritize overall efficiency.
2. **Drill Locating Holes:** After the first-side roughing is complete, drill the locating holes to be used for clamping the reverse side. This is critical! Otherwise, you won’t be able to accurately position the part after flipping it.
3. **Flip-Side Clamping:** Use the locating holes to precisely secure the workpiece onto the fixture. We typically use a large flat plate as the fixture, securing it with screws to ensure rigid clamping and prevent deformation.
4. **Second-Side Roughing and Finishing:** Similarly, begin with roughing, then proceed with the finishing pass as required, including flats, side walls, chamfers, and radii.
5. **Drilling and Tapping:** Finally, drill all holes and complete tapping where necessary.
Siemens NX Roughing Programming Practical: Software Operation and Real-World Techniques

Workpiece Geometry and Blank Setup: Accuracy from the First Step
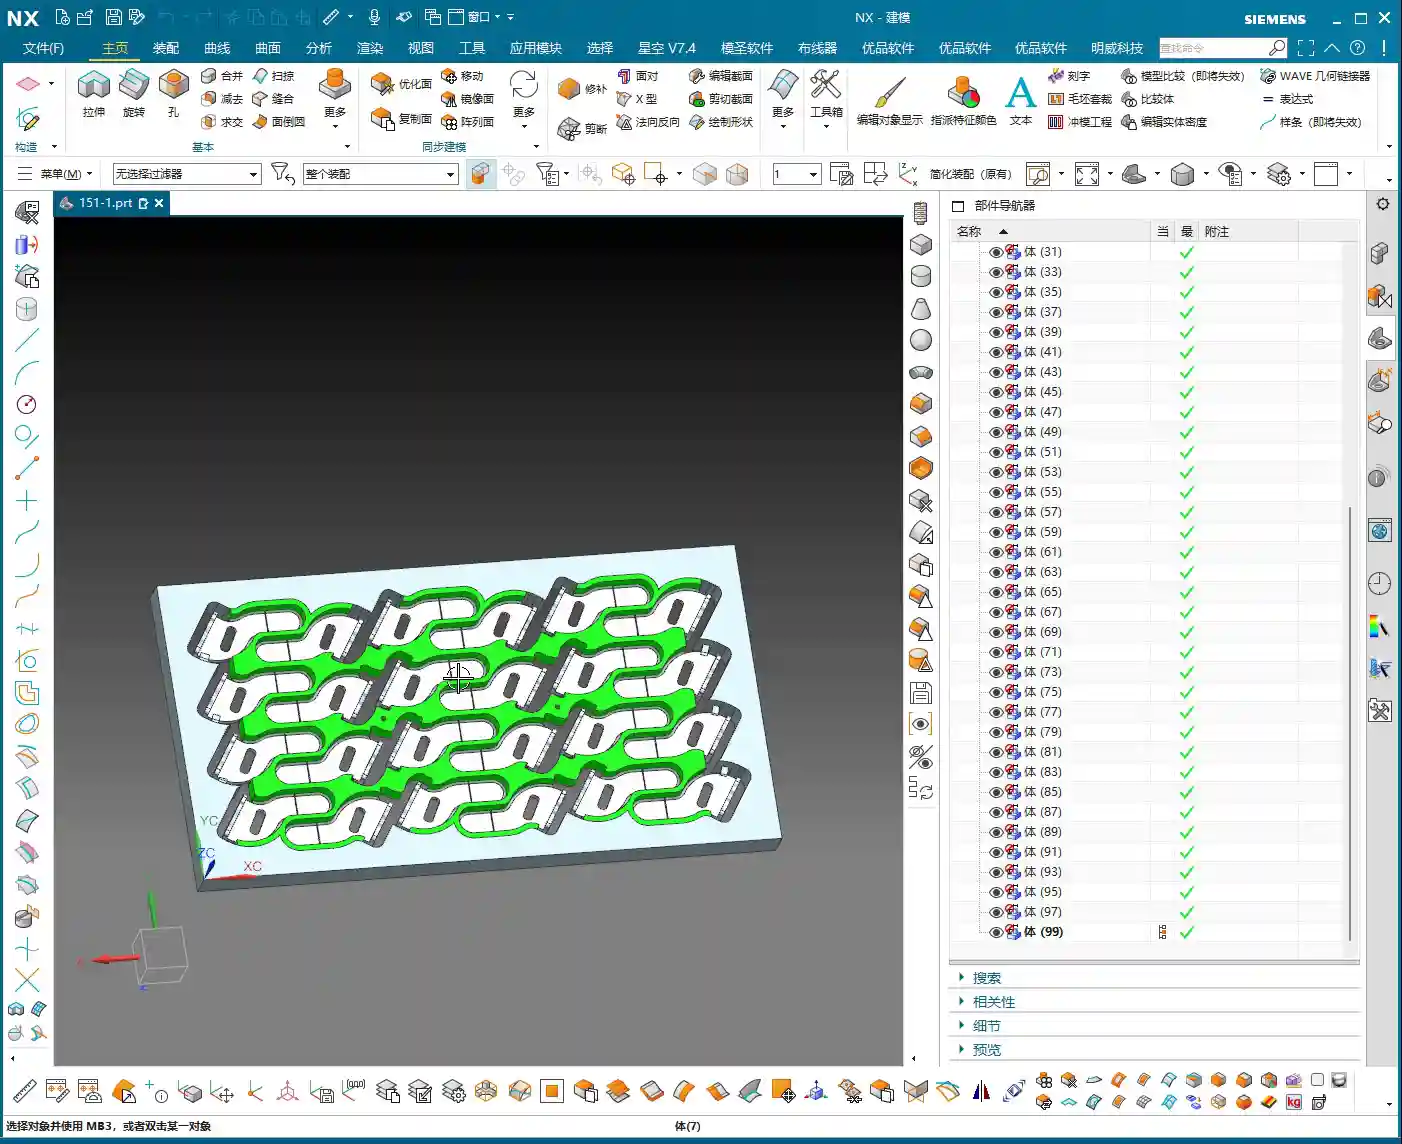
In NX, the first step is to create the “Geometry” and select the part model we intend to machine. Next, define the “Blank.” For plate-like parts, the blank is typically a rectangular block slightly larger than the actual part dimensions. Don’t forget to set the Safe Distance to prevent rapid moves from colliding with the fixturing.
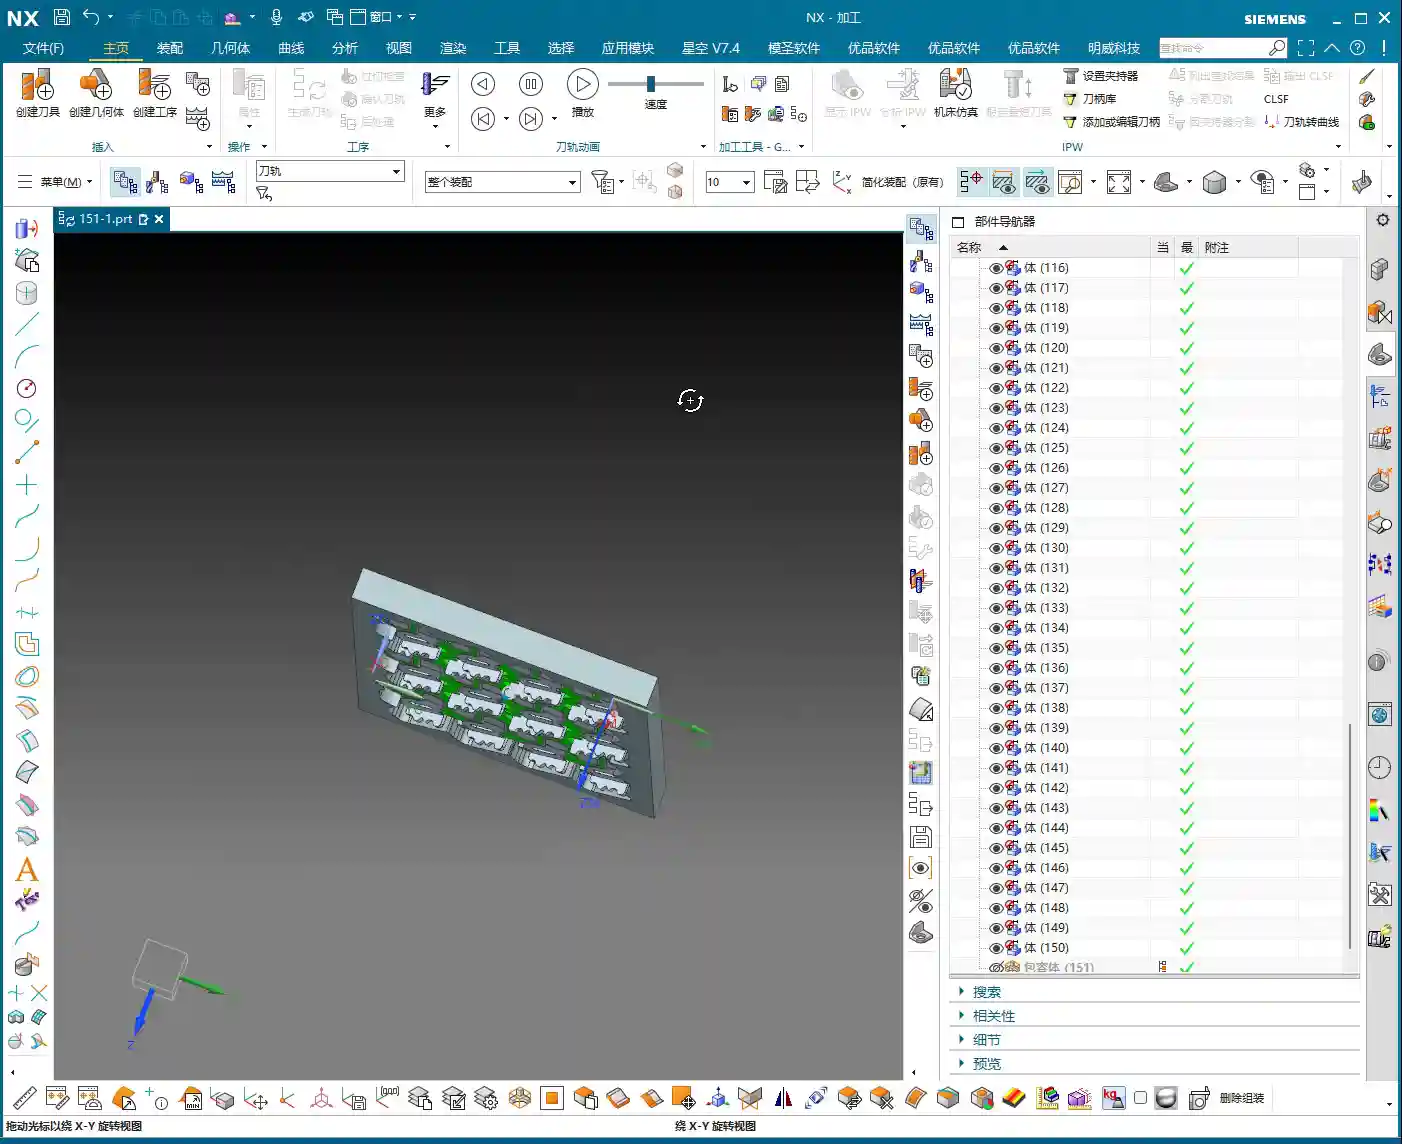
For this job, we’ll duplicate all 24 parts within NX and program them together for maximum efficiency. Note that all toolpaths will be translated and rotated under the same Work Coordinate System.
Tool Selection and Feed Strategy: Right Tool for the Job, Quality Results
For roughing, you definitely start with larger cutters; the goal is efficiency.
* **Roughing Tools:** Based on the part dimensions, the deep pockets and side walls are approximately 12-13 mm wide. For initial roughing, we’ll select a 10mm diameter flat end mill (D10 end mill), which is sufficient to remove the bulk of the material. For deeper internal cavities, consider using extended-reach tools.
* **Semi-Finishing Tools:** For corner cleanup and smaller radii, we’ll use ball end mills. For instance, some radii in the drawing are around R2.3, so a D6 ball end mill (equivalent to R3) can be used. For smaller R1.5 radii, you’ll need an R1.5 ball end mill (i.e., D3 ball end mill).
* **Cutting Parameters:** Cutting parameters for aluminum are relatively flexible, but require careful consideration. Master Wang generally recommends:
* **Spindle Speed (S):** Matched to tool diameter and material. For example, a D10 aluminum end mill can run at 8000-12000 RPM.
* **Feed Rate (F):** Determined by the Depth of Cut (DOC), width of cut, and machine rigidity. Initially, set it to 2000-4000 mm/min; a smaller DOC allows for a faster feed.
* **Axial Depth of Cut (Ap):** For roughing, the Depth of Cut (DOC) can be larger, with a single stepdown controlled to 0.5-0.8 times the tool diameter. For a D10 tool, this means a single stepdown of approximately 5-8 mm.
* **Radial Depth of Cut (Ae):** For roughing, it’s recommended to control the radial stepover to 0.3-0.5 times the tool diameter, which reduces cutting forces and protects the tool.
* **Machining Stock Allowance:** During roughing, we uniformly leave a 0.3 mm allowance for subsequent semi-finishing pass and finishing pass operations.
Toolpath Optimization and Depth Control: Avoid Air Cuts, Control Machining Surfaces
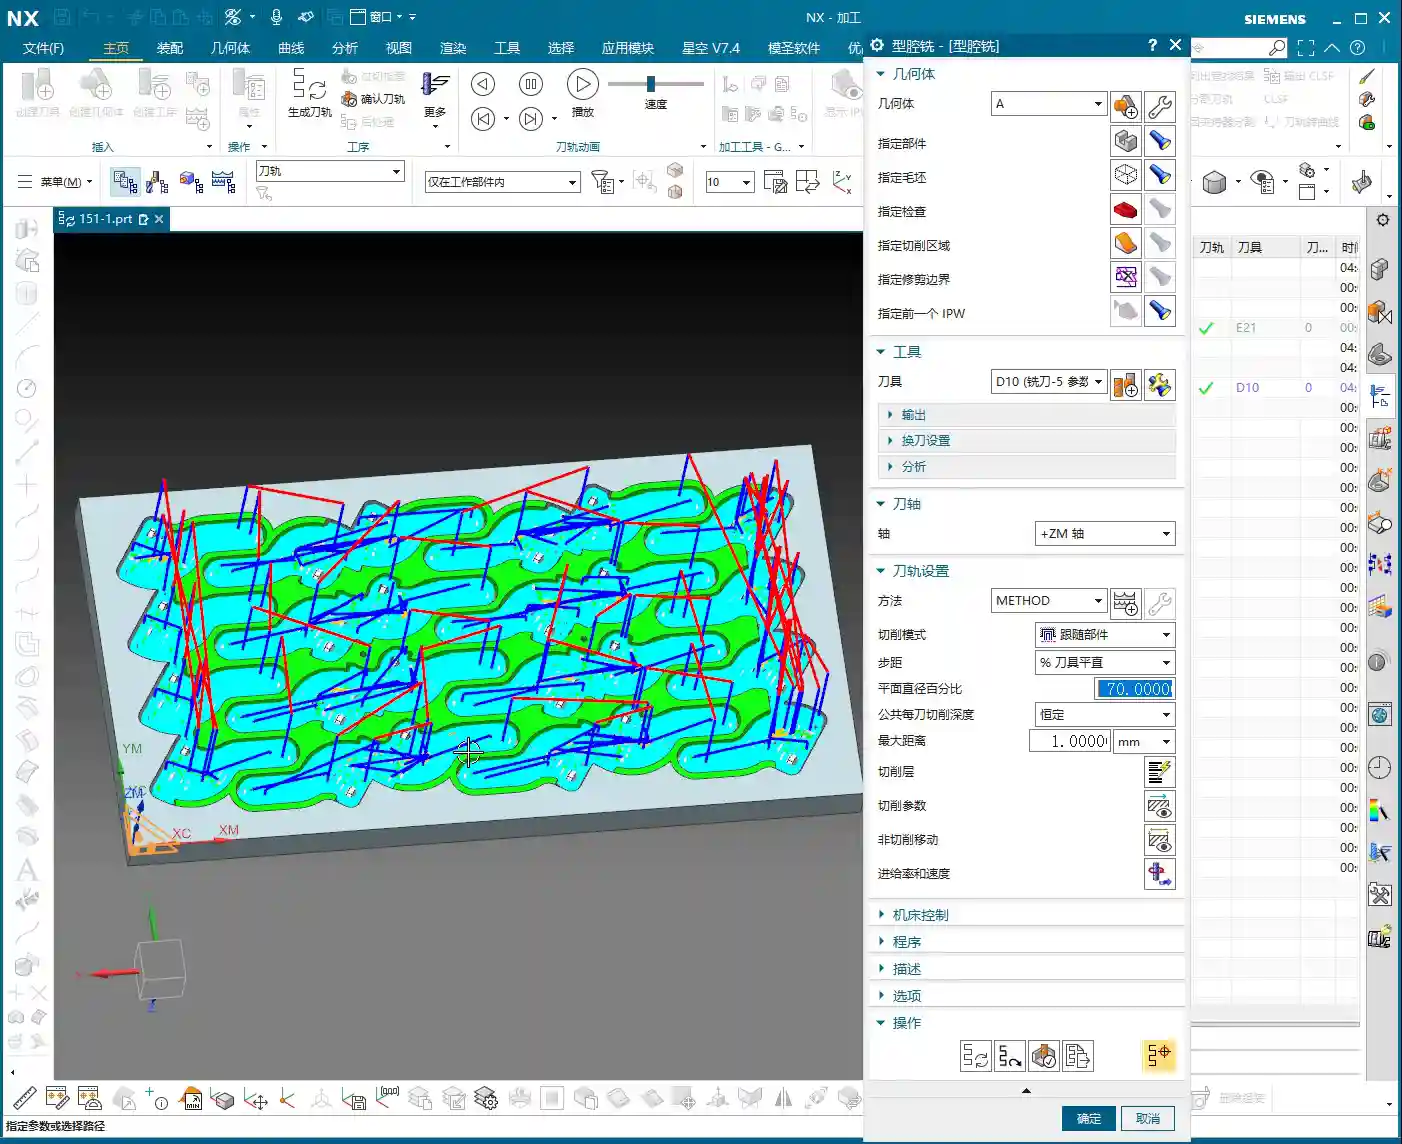
Siemens NX offers many roughing strategies; for instance, “Cavity Mill” is frequently used.
1. **Select Machining Area:** Here’s a crucial point: we cannot let the tool mill directly to the absolute bottom. According to the drawing, the first side is machined only to the lowest flat surface, approximately 4 mm deep. Any deeper material is left for flip-side machining. In NX, select this plane as the Bottom Plane to limit the tool’s downward depth of cut.
2. **Toolpath Optimization:** For multi-part layouts like this, special attention must be paid to the tool’s transition paths between different parts. Strive to choose efficient connection methods to reduce non-cutting time (air cuts). For example, you can set retract heights to allow the tool to rapid move to the next machining area. NX’s “Non-Cutting Moves” options include settings like “Rapid Transfer” and “Safe Height,” which should be used flexibly.
3. **Residual Material Cleanup:** After roughing, corners and grooves that large tools cannot reach will have residual material. In NX, you can use the “Rest Milling” function to automatically identify these areas and clean them with smaller tools. This falls under semi-finishing pass, but the strategy should be planned in advance.

Flip-Side Machining and Auxiliary Processes: Details Determine Success
Precise Positioning and Secondary Clamping: Rock-Solid Stability, Guaranteed Accuracy
After the first-side roughing is complete, the workpiece needs to be flipped. This is when the locating holes drilled earlier come into play.
* **Fixture Design:** You can design a flat plate fixture with dowel pins, using the locating holes machined on the first side to secure the workpiece. Ensure the dowel pins fit snugly into the holes to guarantee positioning accuracy.
* **Clamping Method:** In addition to dowel pin positioning, use clamps or screws to firmly secure the workpiece onto the fixture, preventing vibration or displacement during machining. The clamping force must be uniform to avoid deforming the part.
* **Alignment:** After flipping, it’s necessary to perform tool offsetting again and establish a new Work Coordinate System. This can be done using a dial indicator or a tool setter, using a previously machined surface or side of the workpiece as a datum. For high-precision requirements, even a Coordinate Measuring Machine (CMM) can be considered for assisted positioning. Master Wang has personally dealt with ±0.005mm accuracy issues, and often, it’s the clamping and alignment that make the difference.
Hole Machining and Tapping Considerations: Don’t Mess Up a Good Job
After all roughing, semi-finishing pass, and finishing pass operations are complete, the final steps are drilling and tapping.
* **Drilling:** First, use a center drill for spotting, then use a twist drill or U-drill for drilling. For deep holes, employ peck drilling (G73) or step drilling to ensure efficient chip evacuation and prevent chip packing.
* **Tapping:** Before tapping, confirm that the hole diameter meets specifications and the tapping depth is sufficient. When tapping, select the appropriate tap type (e.g., spiral flute taps, form taps) and cutting fluid. Aluminum is relatively soft, so tapping torque must be carefully controlled to avoid tap breakage or damaged threads. Master Wang reminds you, it’s best to chamfer the hole before tapping to facilitate tap entry.

Words of Experience: Tips You Won’t Find in Textbooks
Observe Cutting Sparks and Listen to Machine Sounds: Your ‘Eyes’ and ‘Ears’ Are More Sensitive Than Parameters
Don’t just stare at the Siemens NX simulation on your computer screen; no matter how realistic, it’s still just a simulation! When you’re truly working, you need to watch the cutting sparks and listen to the machine sounds.
* **Spark Color and Shape:** When cutting aluminum normally, the sparks should be fine, silvery-white chips. If the sparks are yellowish, reddish, or become stringy, it indicates that cutting parameters might be too aggressive, or the tool is worn.
* **Machine Sounds:** Listen to the sound of the tool cutting for any unusual noises. A dull sound might indicate excessive cutting load; a sharp sound could mean the tool is dull or experiencing chatter. These are all lessons learned from experience; listening, observing, and pondering more will serve you better than memorizing parameter tables.
Material Properties and Cutting Parameter Adjustment: Flexibility Shows True Mastery
Although it’s aluminum, different grades (e.g., 7075, 6061) have distinct properties.
* 6061 aluminum is relatively softer and more ductile; ensure ample cutting fluid to prevent built-up edge (BUE).
* 7075 aluminum has higher strength and hardness, leading to increased cutting forces and faster tool wear; parameters should be appropriately reduced.
* Don’t think of titanium alloys or high-temperature nickel-based alloys as distant concerns; when you encounter them, you’ll truly understand the importance of material properties! Remember, for different materials, cutting parameters and tool selection must be adjusted accordingly. There’s no single standard answer, only the most suitable solution.

Tool Wear and Life Management: Know How to Use, and How to Maintain
Cutting tools are consumables, but they shouldn’t just be discarded as soon as they’re worn out.
* **Wear Observation:** Regularly inspect the tool tip and cutting edge for chipping or wear. Early detection and treatment can save a significant amount of money.
* **Custom Tool Grinding:** For some special radii or chamfers, suitable tools might not be readily available on the market. Master Wang’s unique skill is being able to grind custom tools himself, a skill that requires solid fundamentals and accumulated experience. This not only solves machining challenges but also reduces costs.
* **Tool Inventory and Management:** For high-volume production, there must be strict management processes for tool inventory, presetting, and wear-based replacement.
Marketing Insight: Let Quality Products Speak for Themselves
Extracting Core Value from Practical Cases: Your Expertise is Your Best Marketing
Every high-precision part we machine is a tangible product case study. Learning to articulate the process complexity, precision control, and efficiency improvements behind these cases is the most effective marketing.
* For instance, with this 24-part plate roughing job, you can highlight: “High-efficiency multi-station machining, reducing unit cost by XX%” or “Detailed Siemens NX programming, increasing material utilization by YY%“.
* Or consider our solution to the ±0.005mm precision challenge; this can be packaged as an “Ultra-Precision Machining Solution.” These are the points customers care about most.
Keyword Optimization and Content Strategy: Helping Customers Find You in the Vast Digital Ocean
Marketing industrial products isn’t about boasting; it’s about competence and professional articulation.
* **Core Keywords:** For example, “Siemens NX CNC programming,” “5-axis machining,” “precision parts machining,” “titanium alloy machining,” etc., must be accurately placed within your website content, product descriptions, and technical articles.
* **Long-Tail Keywords:** Based on specific case studies, identify more granular search terms, such as “multi-part aluminum plate roughing process” or “Siemens NX impeller programming“.
* **Content Output:** Publish our practical experience, technical tutorials, and pitfall avoidance guides through text, images, videos, and other formats. This not only addresses customer pain points but also demonstrates our professionalism, making your content more “search-engine friendly” and pushing your technical services to the forefront.
Summary: Pitfall Avoidance Guide
1. **Blindly Chasing Speed:** The biggest taboo in roughing is taking too large a depth of cut (DOC) or feeding too fast. This easily leads to tool chipping, breakage, or even damage to the workpiece and machine. Remember: Slow is fast, steady wins the race.
2. **Insecure Clamping:** For multi-part plates like this, if clamping is not secure, it will not only affect accuracy but could also cause the part to fly off, posing a significant safety hazard. Clamping must be stable, tight, and even.
3. **Improper Stock Allowance Control:** Leaving too little stock during roughing puts excessive pressure on finishing pass tools; leaving too much increases finishing pass time. Based on experience and material properties, proper stock allowance control is crucial.
4. **Neglecting Coolant and Chip Evacuation:** Aluminum chips easily stick to or wrap around the tool, leading to poor surface quality or even tool breakage. Ensure ample cutting fluid, and use an air gun for chip evacuation.
5. **Ignoring Tool Condition:** Continuing to use a worn tool not only compromises machining quality but can also lead to greater losses. Inspect frequently, and replace or regrind promptly.
6. **NX Programming: Focusing Only on Results, Not Process:** Simulation is only a reference; you must deeply understand the meaning of each parameter and predict actual cutting conditions. Spend more time operating next to the machine to accumulate experience.
Alright, that concludes today’s lesson. Remember Master Wang’s words: get your hands dirty, think deeply, and your work will get progressively better!
👤 About the Author:
The author is a veteran CNC machining professional with 15 years of industry experience, specializing in UG NX programming. This article is an original work representing personal practical insights.
⚠️ Copyright Notice: Unauthorized reproduction or distribution without prior communication is strictly prohibited.
Leave a Reply