📝 Key Takeaways: ** Today, Master Wang will personally guide you through the ultimate technique for NX Planar Profile Milling Corner Cleanup. The core lies in applying the “Reference Tool” feature. By accurately setting the roughing tool information, the Corner Cleanup tool can intelligently identify and remove residual material, preventing tool crashes. Concurrently, Master Wang shares practical experience on selecting end mills (E-type tools) and setting the overlap distance, ensuring both machining quality and efficiency. **
Introduction: The Importance of Corner Cleanup – Small Details, Big Impact
Listen up, folks! Last time, we covered roughing side wall treatment and tool compensation – these are fundamental skills. But today we’re tackling a tough nut to crack – Planar Profile Milling Corner Cleanup. Don’t think Corner Cleanup is just about switching to a smaller tool and milling away. There’s a lot more to it. Mess it up, and you’re either leaving residual material or causing tool crashes – all wasted effort. In our line of work, you need to be observant and know your stuff. These practical tips, which you won’t find in textbooks, Master Wang will break down and explain thoroughly today!
Residual Material from Roughing: Why Corner Cleanup is Necessary?
The ‘Side Effects’ of Large Tool Roughing
In machining, to improve efficiency, we typically use larger tools for roughing. For example, you might use a D32 flat end mill for roughing a part’s side walls. This D32 tool can quickly mill away most of the material, no problem. However, issues arise when the part’s internal corner radius is smaller than the roughing tool’s radius.
For instance, if your part has an R10 internal corner radius. A D32 tool has a radius of R16. Obviously, an R16 tool cannot perfectly enter an R10 corner. It can only follow an R16 path, which means it will inevitably leave a ring of residual material at the R10 corner. If this residual material isn’t cleaned up, subsequent finishing passes will be problematic. The finishing tool will first encounter these roughing remnants, which could, at best, affect dimensional accuracy and surface quality, or at worst, cause immediate tool breakage!
Residual Material Traps Invisible to the Naked Eye
Don’t just rely on software simulations. When the tool runs on the machine, the cutting sparks and sounds are the most accurate feedback. Sometimes, the screen looks perfectly clean, but in reality, a thin layer of residual material remains. You might not even spot this with your eyes, but it’s physically there, waiting to cause problems for your subsequent finishing passes. Therefore, this Corner Cleanup step must not be overlooked!

The Core of NX Corner Cleanup: The Clever Use of Reference Tools
‘In-Process Workpiece’ and ‘Reference Tool’: NX’s Intelligent Recognition
So, how can you intelligently and efficiently remove this residual material in NX? The core feature lies in the ‘Reference Tool’. Listen up, this is the soul of NX Corner Cleanup!
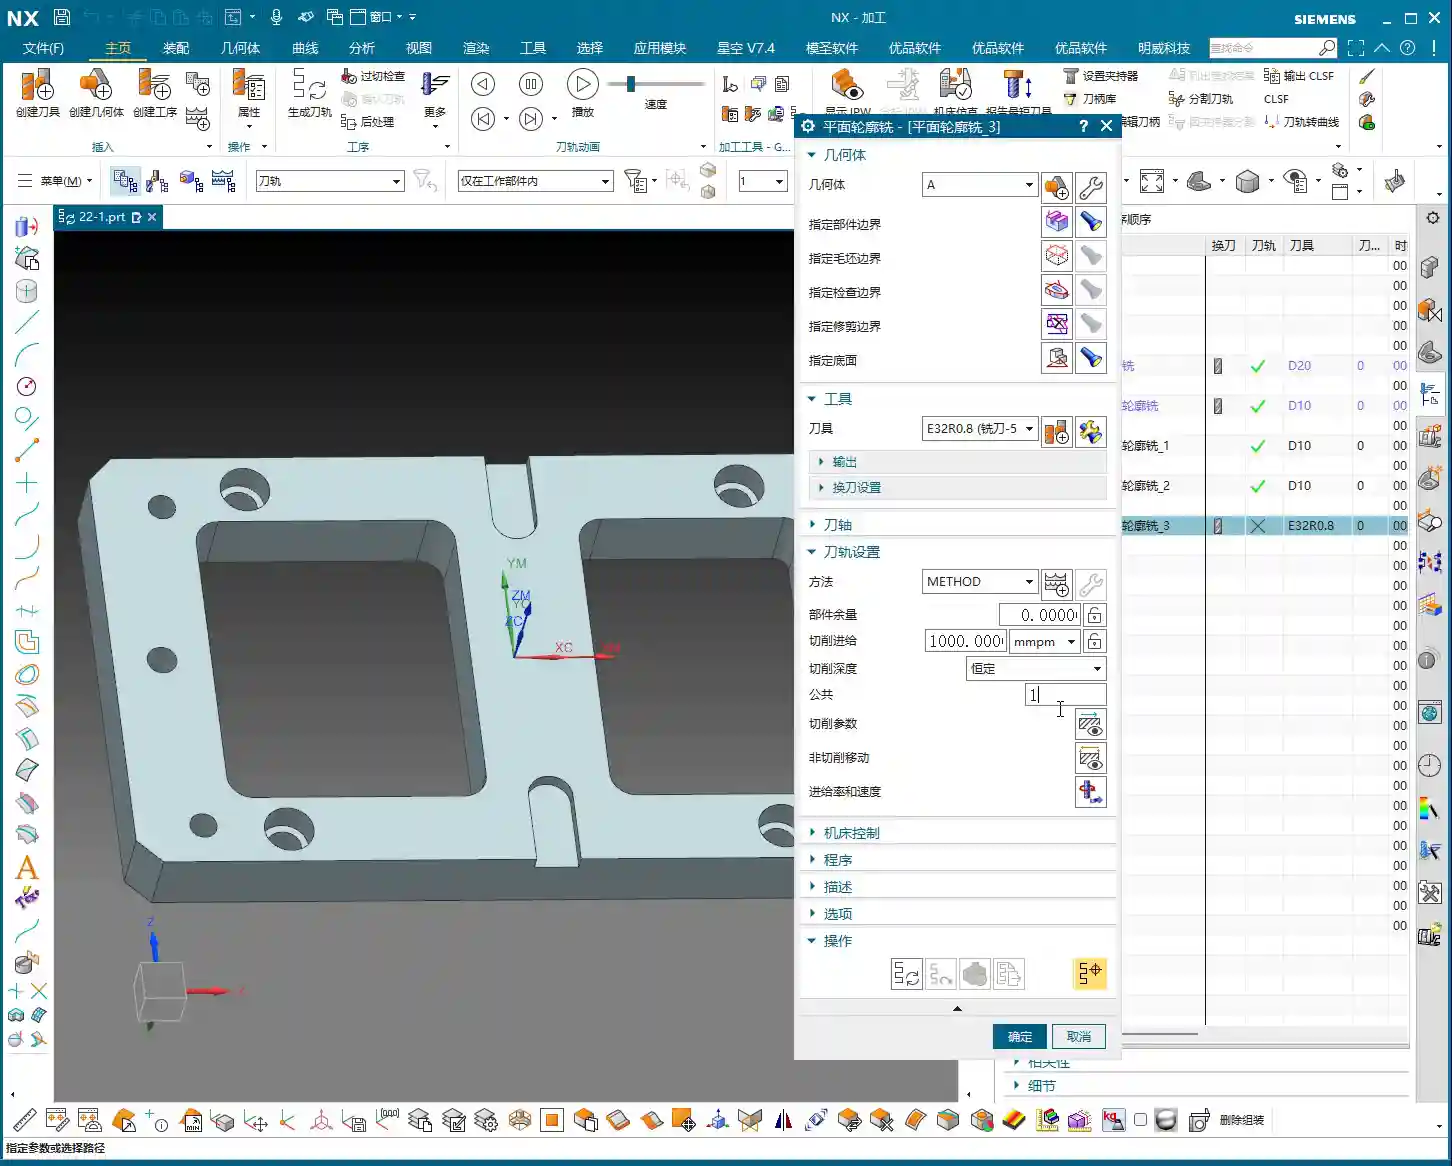
After selecting the ‘Planar Profile Milling’ operation, go into the tool path parameters, find the ‘Containment’ tab, and within it, a sub-option called ‘In-Process Workpiece’. Click on it, and you’ll see a crucial checkbox: ‘Use Reference Tool’.
This function means: you are telling the current Corner Cleanup tool that the area it needs to machine is where the previous roughing tool could not reach. In other words, the Corner Cleanup tool won’t re-mill the entire surface; it will only ‘target’ the residual material and strike precisely. This significantly saves machining time and protects the tool.
Selecting the Correct Reference Tool
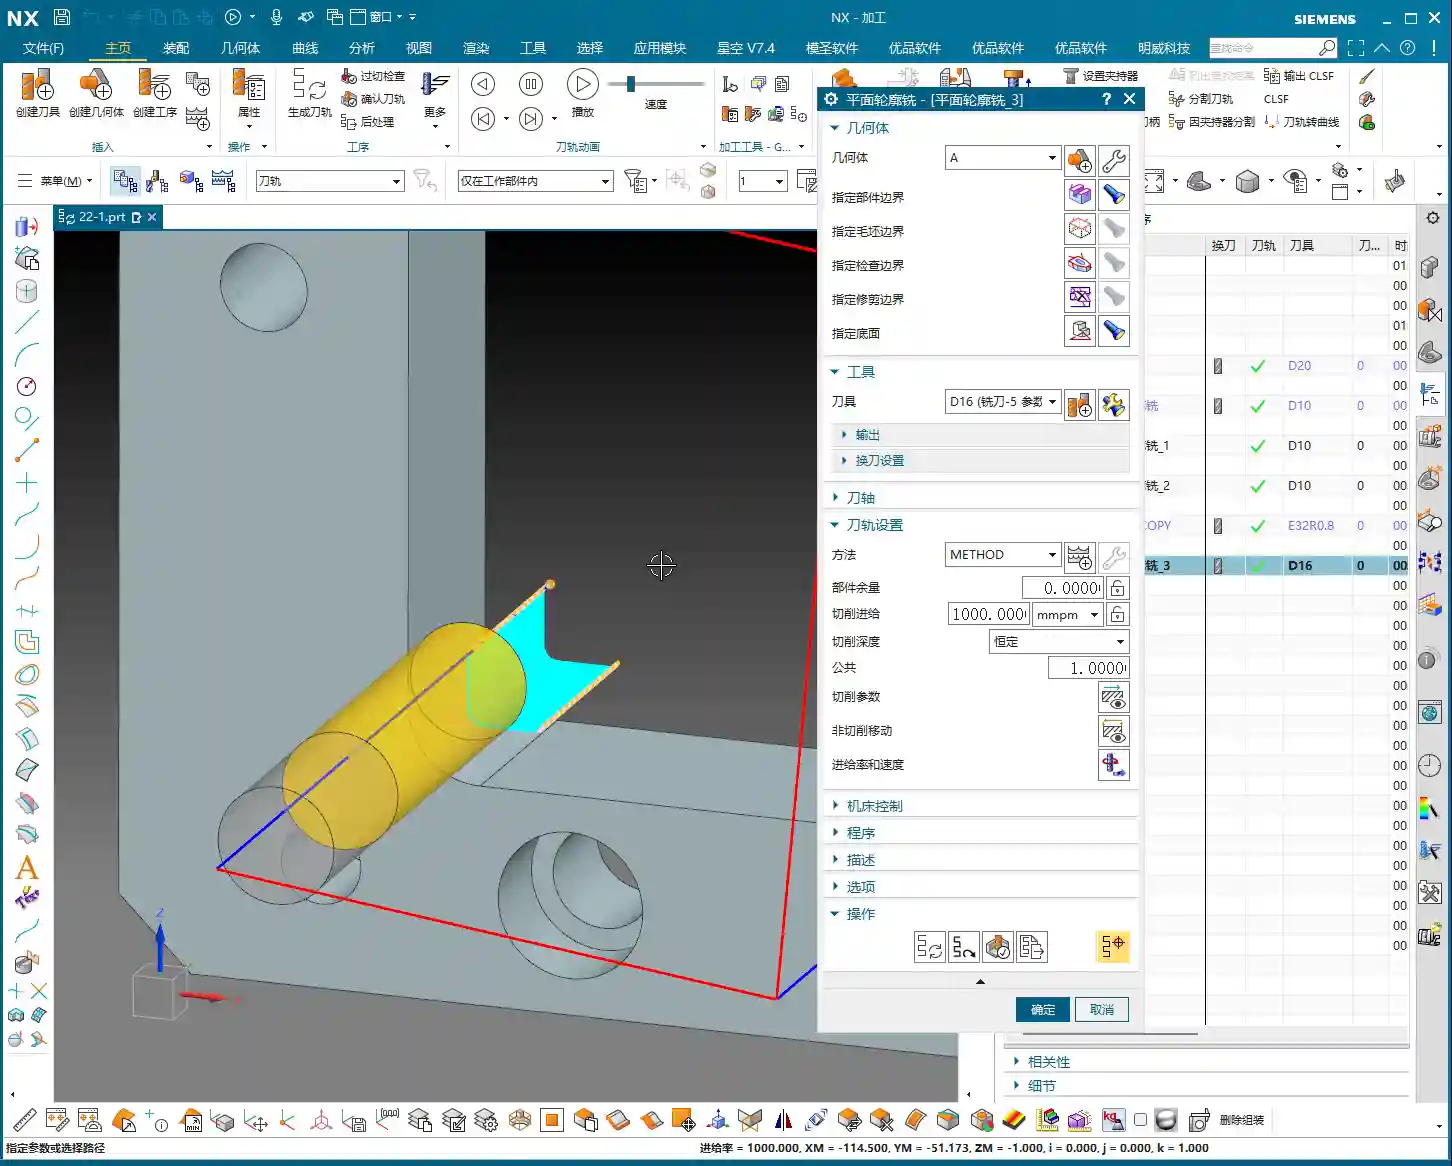
The selection of the reference tool is crucial. You must select the previous tool (or any earlier tool) that left residual material. If your roughing operation used a D32 flat end mill, then for Corner Cleanup, you should designate this D32 tool as your reference tool.
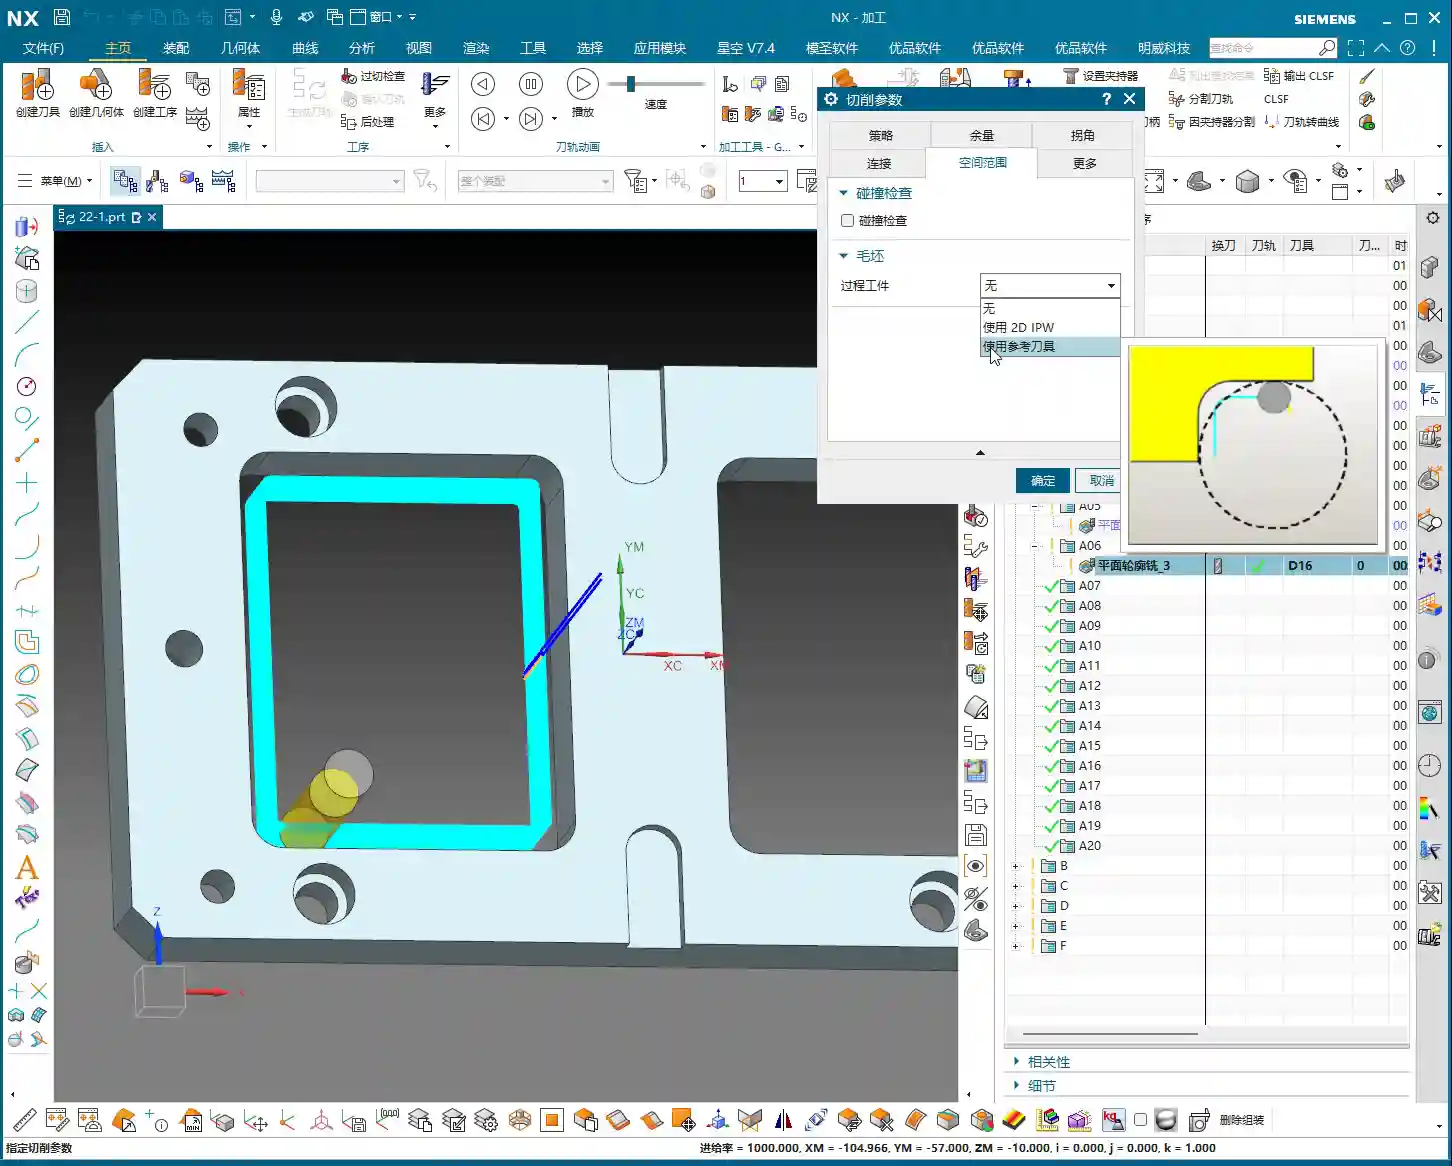
For example, if we are now using a D16 tool for Corner Cleanup. NX will automatically calculate the areas that the D32 tool could not access, based on the geometry of your defined D16 tool and the D32 reference tool, and then only allow the D16 tool to machine these specific areas. Pretty clever, right? That’s the beauty of intelligent machining!

Parameter Deep Dive: Overlap Distance and Reference Tool Selection
‘Overlap Distance’: Safety First, Results Foremost
Within ‘Containment,’ besides the reference tool, there’s another parameter called ‘Overlap Distance’. What does this parameter mean? It makes the Corner Cleanup tool path extend slightly beyond the residual material area, essentially ‘going a bit further.’
Why the need to go a bit further? This is to prevent tool crashes and ensure thorough cleaning. If the Corner Cleanup tool path stops precisely at the edge of the residual material, there’s a risk of tiny remnants being left behind, or vibration during tool entry/exit, affecting surface quality. So, Master Wang’s experience is that the default value of 2mm is usually reliable, but you can adjust it based on the actual situation. For instance, for precise Corner Cleanup, I might set it to 0.5mm to 1mm to ensure thorough cleaning without excessive air cutting.
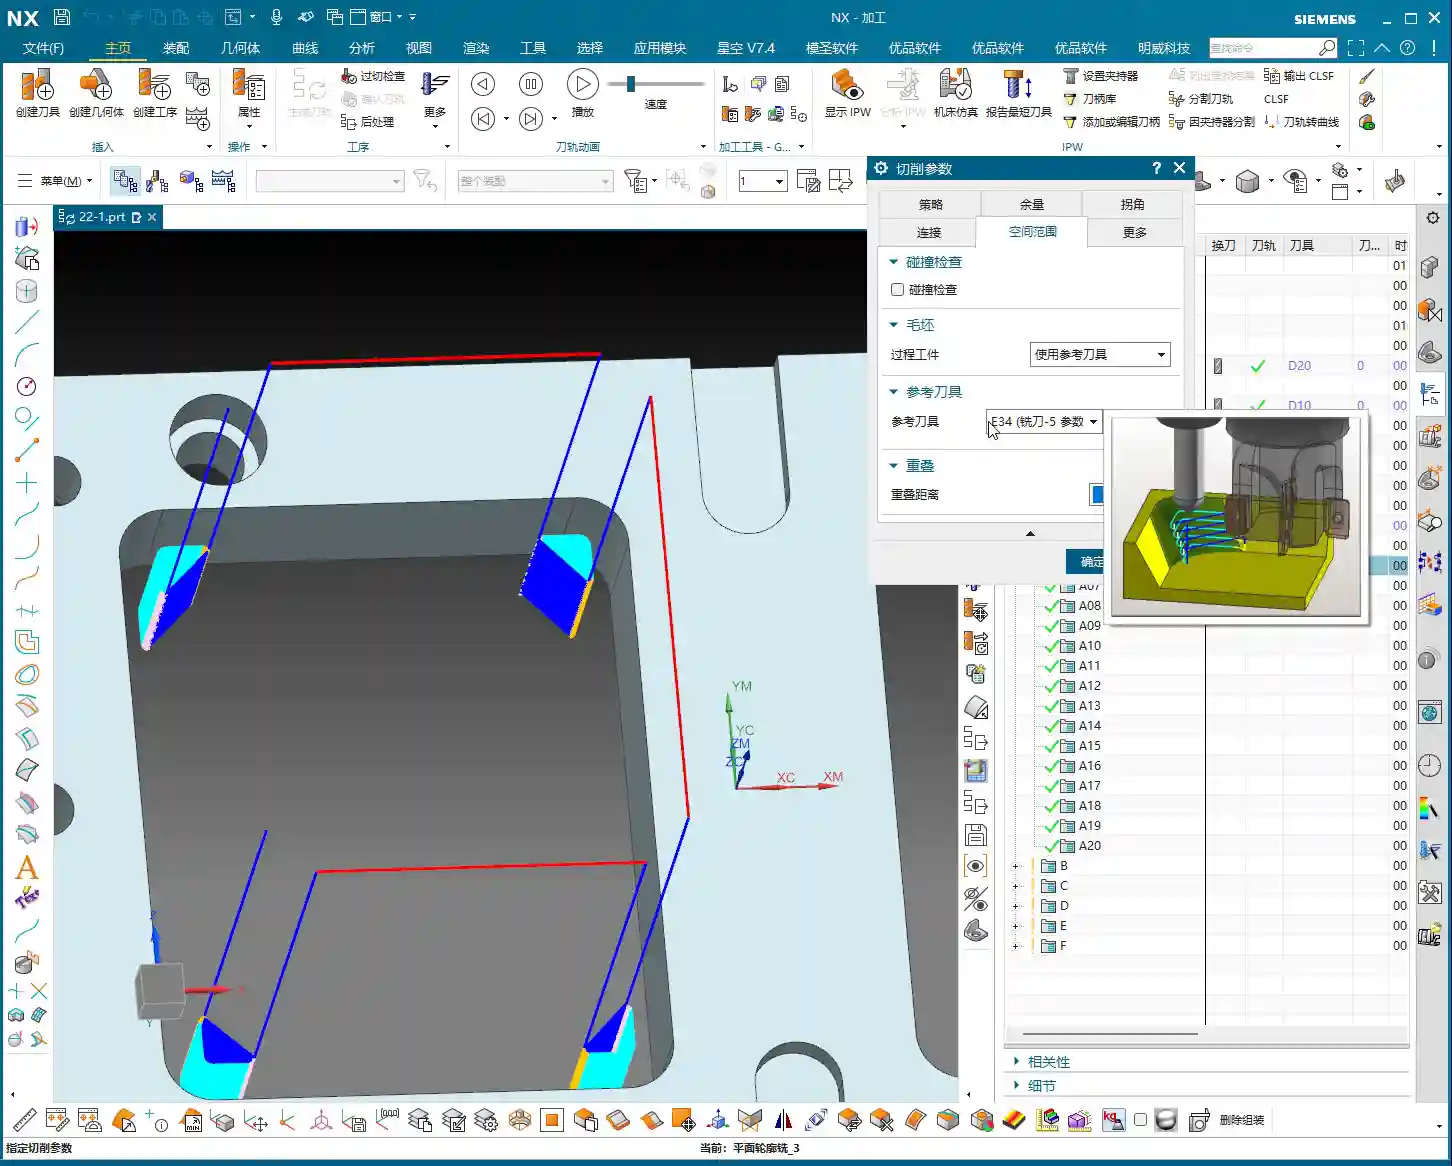
The ‘E’ vs. ‘R’ Debate for Reference Tools: Master Wang’s Exclusive Secret
In NX, tools typically come in E-type (End Mill, flat bottom) and R-type (Ball Nose, ball-end or corner radius) variations. When setting up reference tools, there’s a very important practical trick.
If your roughing tool is an E32 (i.e., D32 diameter, no corner radius), then when defining the reference tool, it’s best to use an E-type tool for reference as well. Even better, Master Wang typically references a slightly larger E-type tool, such as an E34, and then sets the overlap distance to 0.
Why is this done? Because when NX calculates residual material, it uses the shape of your defined reference tool as the basis. If you reference exactly a D32 tool, even with an overlap distance set, sometimes at the roughing and Corner Cleanup tool path transition, a minute ‘witness mark’ (a trace of residual material) might still be left. However, by referencing an E34, you’re essentially telling NX that ‘the previous tool’ was even larger than D32. This causes the D16 Corner Cleanup tool path to extend further outward, completely sweeping away any tiny bit of residual material that D32 might have left. This ensures thorough cleaning while avoiding unproductive air cutting caused by overlap distance – these are hard-earned insights from years of experience!
Conversely, if you used a D32 flat end mill for roughing but referenced a D32R0.8 (with an 0.8mm corner radius) tool, then NX would assume the roughing tool had an R0.8 corner. The calculated residual material area would be smaller, potentially leaving remnants in some places, forcing you to add an extra pass – isn’t that just wasted time? Therefore, matching the tool type and size is particularly critical here.

Corner Cleanup Strategy: Climb Milling vs. Mixed Milling
Choosing the Right Cutting Method
In precise operations like Corner Cleanup, the choice of cutting method also influences the final result. NX offers options such as Climb Milling, Conventional Milling, and Mixed Milling.
Master Wang typically recommends Climb Milling for Corner Cleanup. The advantages of Climb Milling are that the cutting force direction aligns with the feed direction, leading to relatively longer tool life and better machined surface quality, making it especially suitable for Corner Cleanup operations that require a good surface finish. While Mixed Milling can improve efficiency in some situations, for scenarios like Corner Cleanup which demand stable cutting, Climb Milling offers higher reliability.

Summary: Pitfall Avoidance Guide
- Understand the essence of the ‘Reference Tool’: It’s not about re-machining the entire part, but intelligently identifying and removing residual material left by the previous tool. This is key to improving efficiency and tool life.
- Precisely select the reference tool: Ensure your chosen reference tool accurately reflects the shape and size of the tool used in the previous roughing step. If the roughing tool was a flat end mill (E-type), select an E-type for reference.
- Master Wang’s Exclusive Secret: If roughing with a D32 flat end mill, for Corner Cleanup, you can reference an E34 (a slightly larger E-type tool) and set the overlap distance to 0. This thoroughly removes residual material, prevents minute ‘witness marks,’ and reduces air cutting. If your reference tool is the same size as the actual roughing tool, then the overlap distance must not be 0; a 2mm setting is recommended.
- The importance of overlap distance: It ensures the tool path extends slightly beyond the residual material area, preventing tool crashes, and ensuring thorough Corner Cleanup. This parameter is often overlooked by newcomers.
- Use Climb Milling for Corner Cleanup: For fine machining operations like Corner Cleanup, Climb Milling generally provides better surface quality and tool life.
- Think outside the box: Don’t be rigid! Features like ‘Reference Tool’ and ‘Tool Compensation’ are interchangeable across many operation modules in NX, for example, Floor and Wall Milling can also utilize these techniques. Learning to apply principles broadly is how you master NX and become a true expert!
Corner Cleanup is an art that you won’t master just by clicking a few buttons. It requires a deep understanding and extensive experience with tools, materials, machines, and Siemens NX software. Practice extensively, observe diligently. Don’t just listen to Master Wang; get your hands dirty, try things out, watch the cutting sparks, feel the machine vibrations – that’s where true skill comes from!
👤 About the Author:
The author is a veteran CNC machining professional with 15 years of industry experience, specializing in UG NX programming. This article is an original work representing personal practical insights.
⚠️ Copyright Notice: Unauthorized reproduction or distribution without prior communication is strictly prohibited.
Leave a Reply