📝 Key Takeaways: Master Wang guides you through practical Siemens NX Secondary Dynamic Milling, unveiling the “stock inheritance” mechanism. Gain in-depth understanding of how 3D machining impacts toolpaths, and learn to adjust operation sequences to avoid common “red alarm” errors. Master the trick of setting Minimum Stock Removal to optimize cutting efficiency. This guide emphasizes when to use Workpiece vs. “A” mode, eliminating confusion, ensuring precise and efficient machining, and reducing costs!
Foreword: Master Wang on Dynamic Milling
Alright lads, today we’re talking about “Secondary Dynamic Milling” in Siemens NX, also known as “Secondary Roughing.” At its core, this is the same beast as the regular Dynamic Milling we’ve discussed before. Both use a 3D approach to clear out corners and residual material. Don’t let the complex name fool you; once you grasp the principle, it’s straightforward to operate. If you’ve mastered regular Dynamic Milling, Secondary Dynamic Milling will come naturally.
The “Stock Inheritance” Mechanism in Siemens NX
Listen up, this section is critically important. Textbooks might not cover it in such detail; this is all hard-won experience from real-world pitfalls.
Problem Revealed: Has the Stock “Been Machined”?
Have you ever encountered this situation: it’s clearly a secondary roughing operation, but when you look at the Workpiece, it appears as if it’s already been machined, with all the edges nearly gone? This isn’t the software glitching out; it’s the fault of “inheritance”! Just as Master Wang demonstrated in the audio, if you select a A-1 Dynamic Milling operation, the Workpiece looks like it’s already finished – that’s not right.
This is because Siemens NX, by default, will treat the machining result of the previous operation as the “stock” for your current operation. If that “previous operation” you’re referencing has already machined the part completely, then your secondary roughing operation will naturally have nothing left to do.
Root Cause: Inheritance Relationships Between Operations (Workpiece)
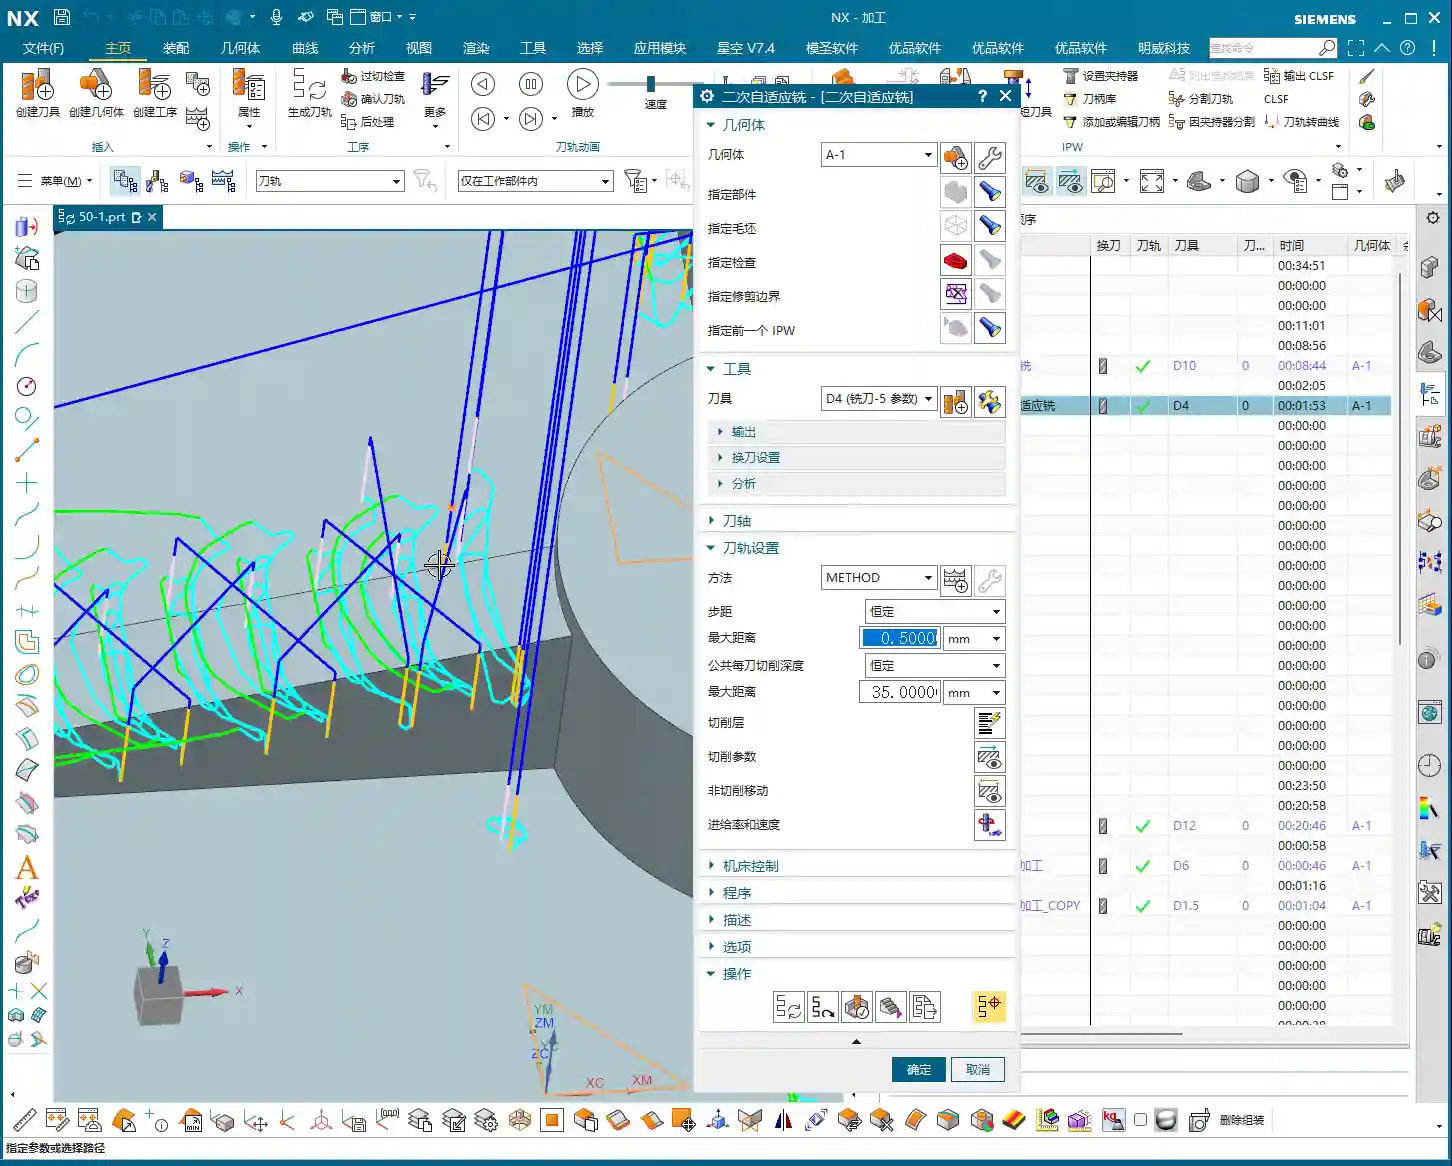
The Workpiece we select under “Geometry” isn’t a static entity; it has “memory.” Especially when you select “Use 3D,” it will faithfully read the residual stock after the previous referenced operation. This “Use 3D” option tells the software that you want to perform precise 3D residual stock calculations, not just a simple 2D contour determination.
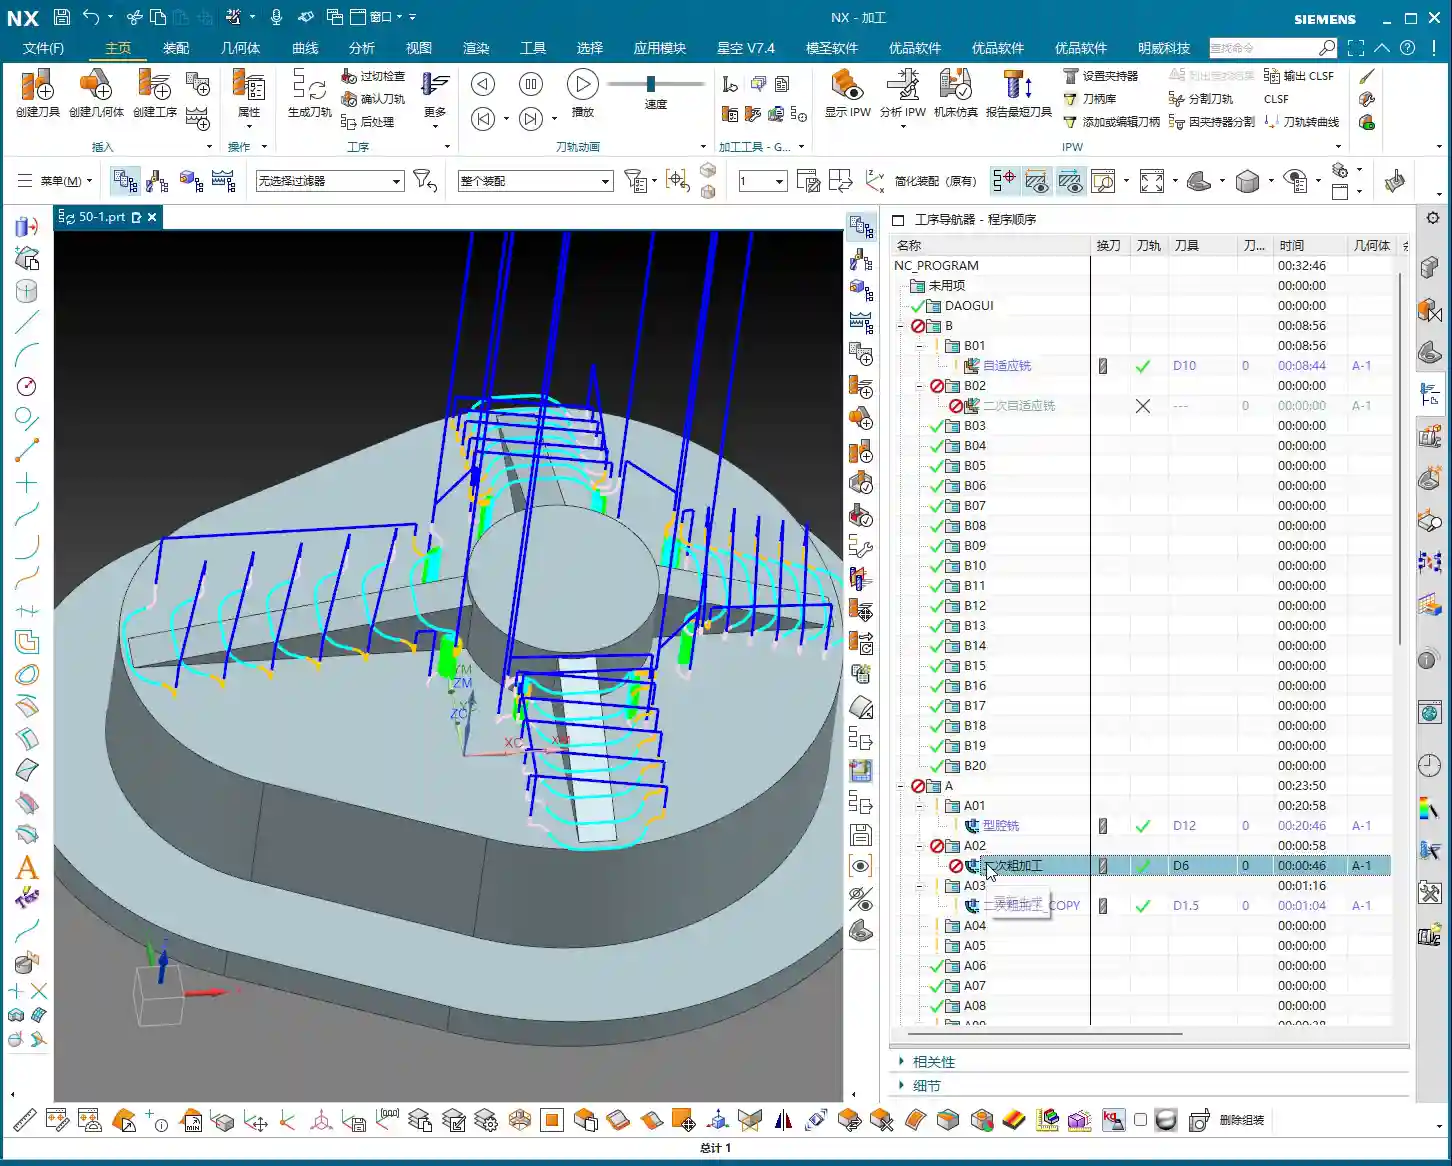
If your Dynamic Milling operation is placed after the roughing operation, it will inherit the stock remaining after the roughing pass. If the roughing hasn’t been defined correctly, or is defined incorrectly, or even hasn’t been machined yet, then this Dynamic Milling operation might have nothing to machine or might machine the wrong areas. As mentioned in the audio, if the preceding operation also used 3D, then the subsequent operation inherits its machining result, layer upon layer, just like Russian nesting dolls.
Pay attention, this is important: If your operation uses Workpiece and has “Use 3D” checked, then its calculation is based on the final machining state of all preceding operations that also used Workpiece and “Use 3D.”

Solution: Operation Sequencing and “A” Mode
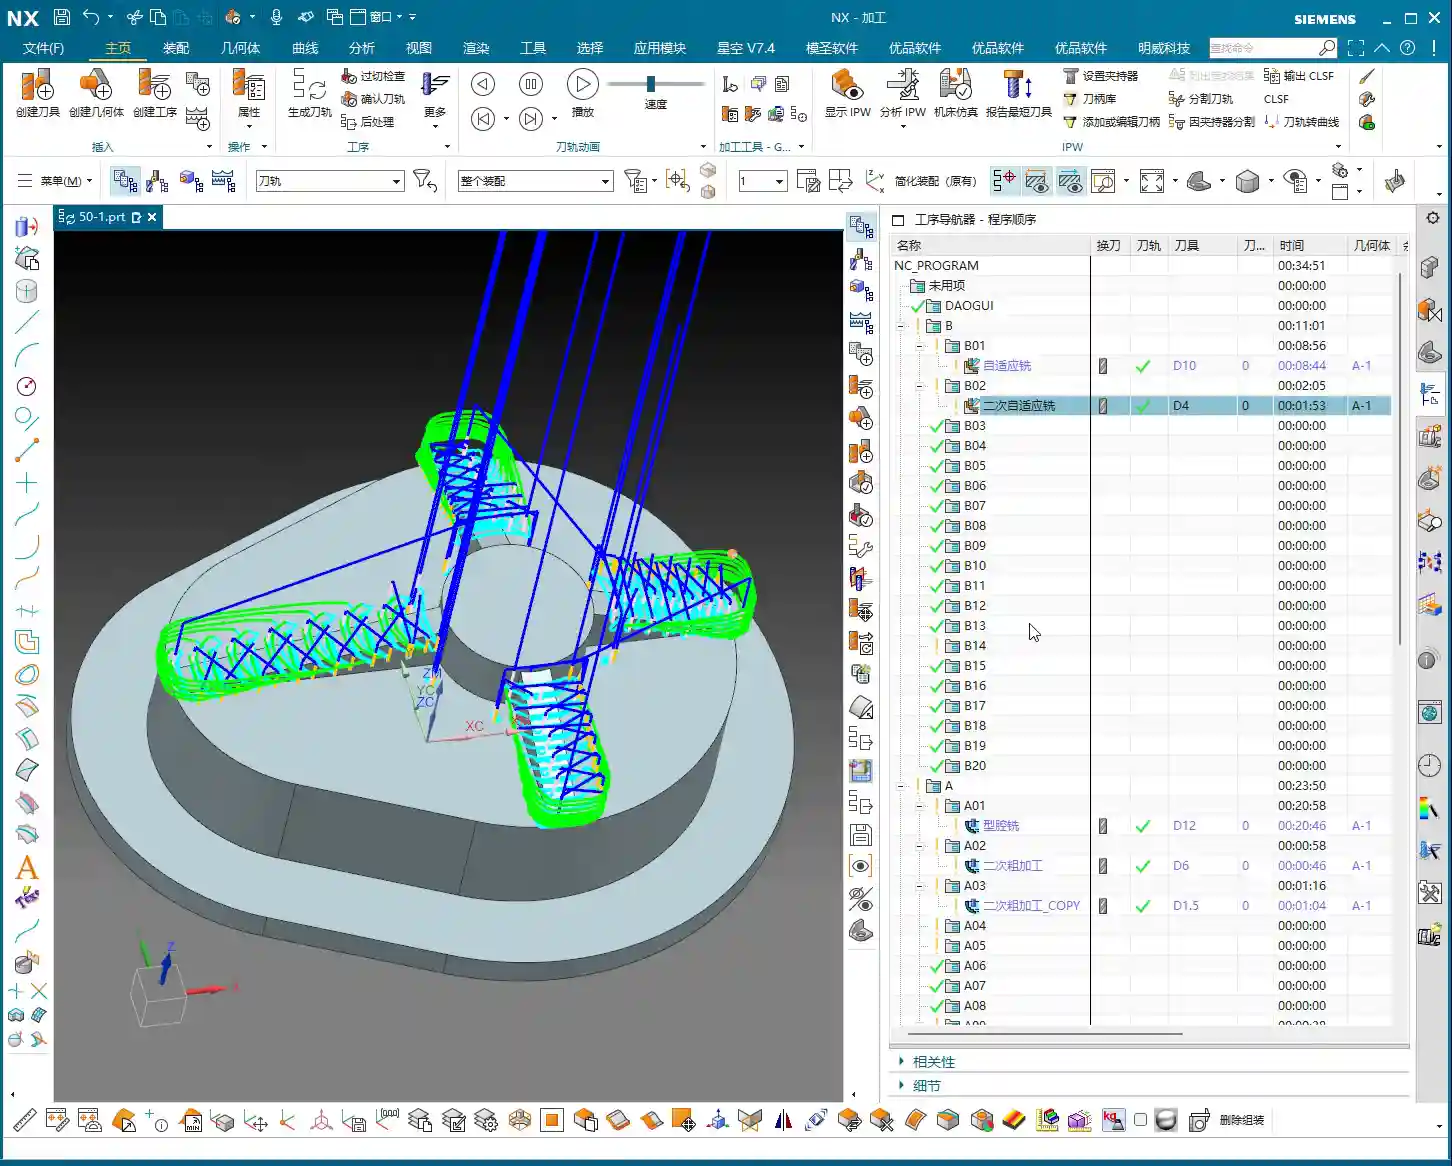
When the stock seems incorrect and the operation turns red (error), your first reaction should be to check your operation sequence! Arrange operations with clear inheritance relationships, such as roughing and secondary roughing, according to the actual machining sequence. Just as Master Wang demonstrated in the audio, move the roughing and dynamic milling operations to the front so they machine the original stock first. This way, subsequent operations will correctly inherit their machined state, the operations won’t turn “red,” and a simple “generate” will pass them.
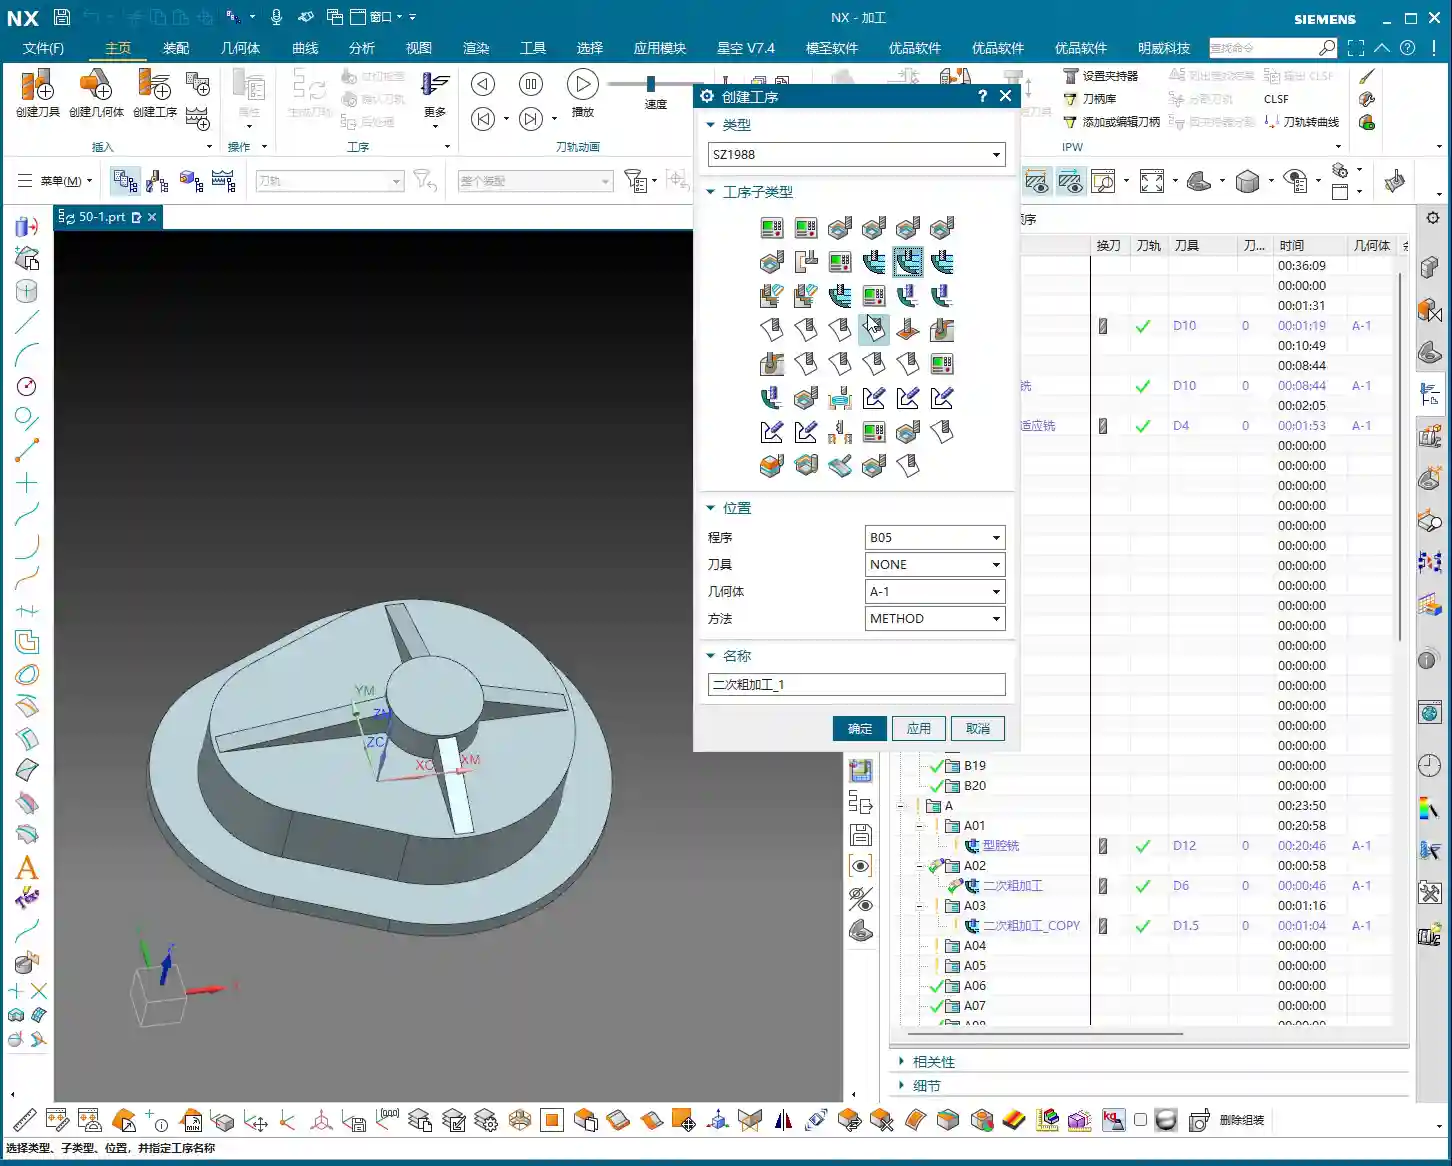
Master Wang’s Pro Tip: For beginners, if you’re unclear about the “Workpiece” inheritance relationship, **just avoid using Workpiece altogether; directly select “A.”** Selecting “A” means you’re telling the software that this operation is targeting the entire geometric model of your part. As for the stock, we manually define the machining area or control it via toolpath. This can prevent many unnecessary issues and “red alarms.” Since you’re not using 3D for stock calculation, it won’t inherit the machining state of preceding operations; it will only recognize your currently defined machining region. This is a “lazy” yet effective method to avoid detours!
Practical Parameter Settings for Secondary Dynamic Milling
Theory’s done; now let’s get practical and see how to adjust the parameters. These are the optimal configurations I’ve refined over many years; just use them as is.
Tool Selection and Stepdown: The Power of Templates
For tool selection, it depends on the actual situation, for example, using a D4 end mill. I, Master Wang, typically use templates, so many parameters are ready to go with a click. For instance, the Stepdown (Depth of Cut), we usually set it to around 0.5mm (approx. 0.02 inch), depending on the material and tool conditions. Other connection parameters and the like usually don’t need changing if you’re using a template.
Why use templates? Efficiency! Who has time to set everything from scratch every time? Consolidate common parameters, and you save effort, time, and reduce errors. This is a crucial step for improving your efficiency in the future and the cornerstone of standardized production.

Key Parameter: Minimum Stock Removal
This parameter, “Minimum Stock Removal,” listen very carefully, is the key to Dynamic Milling efficiency!
Its purpose is to tell the software not to machine an area if the remaining stock is less than this value. In the audio, Master Wang suggests setting it to 0.5mm (approx. 0.02 inch). Why?
- Consider this: if you set it too small, for example, 0.01mm (approx. 0.0004 inch), the software will relentlessly calculate and try to remove material in areas with almost no stock. This will generate an excessive number of toolpaths, leading to calculation times that will make you question your life choices.
- Furthermore, the actual machining effect won’t improve much, and efficiency might even decrease due to too many air cuts.
- Therefore, setting it to 0.5mm (approx. 0.02 inch) ensures most residual material is removed while avoiding unnecessary calculations and cutting. This is based on experience and represents a balance between cost and efficiency. You can’t justify tying up the machine and tool for such a tiny, negligible amount of stock, can you?
Toolpath Generation and Simulation: Efficiency and Observation
Don’t just watch the software run; you need to understand what’s happening behind the scenes.
Time-Consuming Nature of 3D Calculation
3D machining in Siemens NX, especially dynamic milling that requires precise residual stock calculation (particularly when you have “Use 3D” checked), will take a comparatively longer time to calculate, and this is normal. That’s because the software has to analyze the entire 3D model, calculate the stock at every point, and then plan the toolpaths – this is far more complex than simple 2D operations.
So, when calculations are slow, stay calm, grab a cup of tea, and don’t click around aimlessly. Patiently wait; a high-quality toolpath is worth it.

Observing Cutting Sparks: Beyond Software Simulation
Software simulation might look great, but it’s still just a simulation! When you’re on the machine later, keep your eyes on the cutting sparks and your ears on the cutting sound. If the sparks are too yellow or the sound is too dull, you might be experiencing excessive Depth of Cut; immediately reduce the feed rate. If the sparks are too bright or the sound is too crisp, it could indicate tool wear or parameters set too low. You need to combine all these observations to truly prevent tool wear and ensure machining quality.
This is “real skill” that you won’t learn from textbooks; you have to gradually accumulate it yourself. Most of my fifteen years of experience, Master Wang, came from “seeing” and “listening” on the shop floor.
Master Wang’s Secret: The “Golden Rules” of Siemens NX Programming
Next are Master Wang’s “plain-talk” summaries for Siemens NX programming, simplifying those complex topics from before. These are your “golden rules” for future work.
When to Use `Workpiece` and `Use 3D`
Listen closely, the core principle is: If your operation needs to precisely calculate the residual stock based on the machining results of a preceding operation (e.g., secondary roughing after roughing, or secondary dynamic milling after cavity milling), then:
- You must set “Geometry” to Workpiece and check “Use 3D” in your Roughing operations and all Dynamic Milling operations requiring this precise residual stock calculation.
- Furthermore, their sequence in the operation navigator must be strictly correct, adhering to the actual machining process. Otherwise, you’ll get a flurry of “red alarms,” and you won’t know how to proceed.
- The purpose of this setting is to enable the software to accurately “know” how much material remains to be cut. From roughing to semi-finishing, this progressive calculation of residual material is crucial for ensuring final accuracy and efficiency.

Strategy for Non-3D Toolpaths: Revert to “A” Mode
Aside from the 3D Dynamic Milling operations mentioned above that require precise residual stock calculation, for **all other operations, such as face milling, floor/wall milling, contour milling, etc.**, you should consistently set “Geometry” to “A.” Then, manually specify the part (the geometry to be machined) and manually specify the cutting region (the area for the toolpath to clear).
The advantage of doing this is that operations no longer influence each other’s “stock” status. If you change the order of one operation, the others won’t turn red due to inheritance issues. This greatly simplifies your learning and troubleshooting, making programming much more controllable. For these non-3D machining modes, they don’t need to know precisely how much stock was removed in the previous step; they only need to know which face or region to machine.
In the initial learning phase, this method will help you avoid many detours and the awkward situation of “everything turning red” with one change. Once you have enough experience and a thorough understanding of Siemens NX’s inheritance mechanism and 3D calculations, then it won’t be too late to experiment with more complex Workpiece management.
Summary: Pitfall Avoidance Guide
- Operation Sequence is Key: For operations involving “stock inheritance” (especially Workpiece operations with Use 3D enabled), ensure they are arranged according to the actual machining sequence, like an assembly line, step by step, without skipping.
- Don’t Panic at “Red Alarms”: If an operation turns red, chances are it’s an inheritance issue. Check references and sequence, or if an operation that depends on prior machining has been moved too early.
- Flexible Use of “A” Mode: For most standard machining operations, using “A” mode and manually defining the machining area can effectively avoid the complications of stock inheritance. This is the most reliable method for beginners.
- Minimum Stock Removal Must Be Reasonable: Randomly setting it to 0.01mm (approx. 0.0004 inch) is a waste of resources! Set it to 0.5mm (approx. 0.02 inch) or even larger, based on actual needs, to balance efficiency and quality, and reduce calculation time.
- Experience is the Best Teacher: Software is just a tool. Theory must be combined with practical operation. Observe more, think more, to truly become an expert. Don’t just stare at the screen; pay attention to the machine and analyze problems!
👤 About the Author:
The author is a veteran CNC machining professional with 15 years of industry experience, specializing in UG NX programming. This article is an original work representing personal practical insights.
⚠️ Copyright Notice: Unauthorized reproduction or distribution without prior communication is strictly prohibited.
Leave a Reply