📝 Key Takeaways: Master Wang personally reveals the practical secrets of Siemens NX CAM’s Surface Drive Percentage! Master the cutting direction and the synergy of six key parameters to precisely control toolpath start and end points, as well as boundary trimming and extension. Effortlessly manage stock allowance for roughing and finishing passes, significantly boosting machining efficiency and part accuracy. Say goodbye to guesswork programming, and take control of both cost and efficiency!
Hello everyone, I’m Master Wang!
Today, let’s talk about a particularly practical feature in Siemens NX CAM—Surface Drive Percentage. Textbooks might give you a few concepts, but in our actual work, this feature is crucial for refining toolpaths and boosting both efficiency and accuracy. Listen up, because these are “hardcore” insights I’ve gained from over a decade of hands-on experience at the machine!
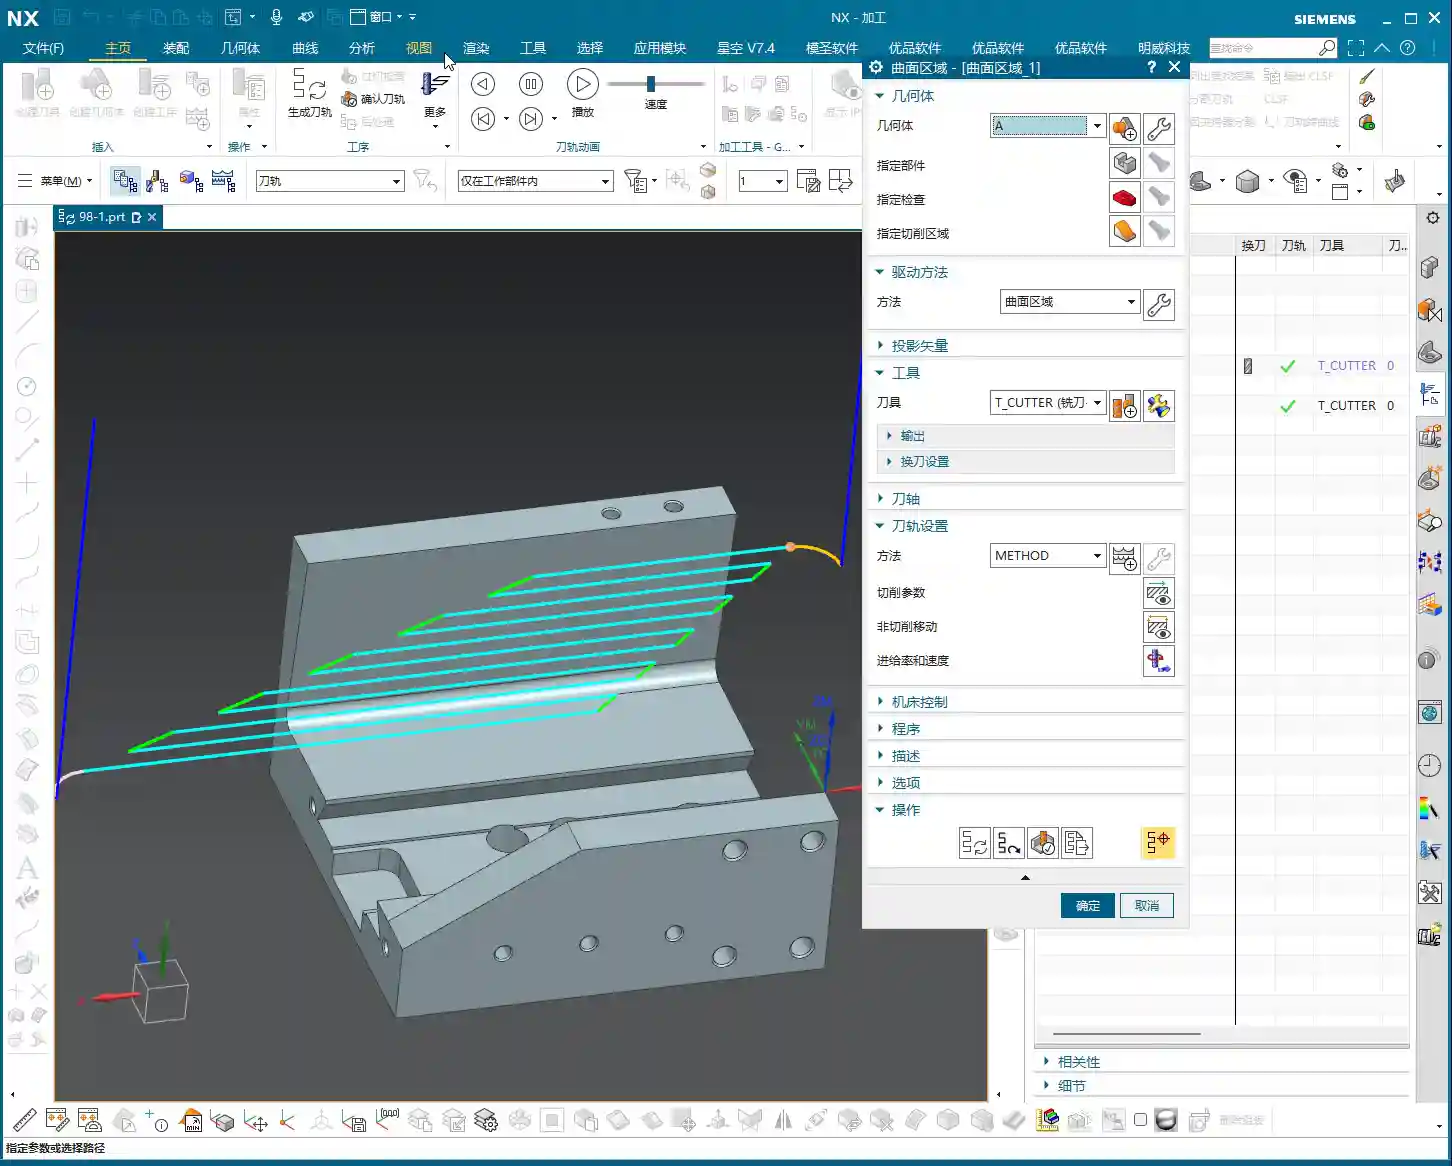
Core Concept: What Exactly is Surface Drive Percentage?
Simply put, Surface Drive Percentage allows you to precisely control the start point, end point, and extension or trimming along the edges of your toolpath on the drive surface. Don’t underestimate these percentages; when used effectively, your toolpaths will run smoother, machining efficiency will be higher, and part accuracy will be better assured. It’s like drawing a “racetrack” for your tool, telling it where to start, where to stop, and even allowing it to run slightly off the track or finish early.
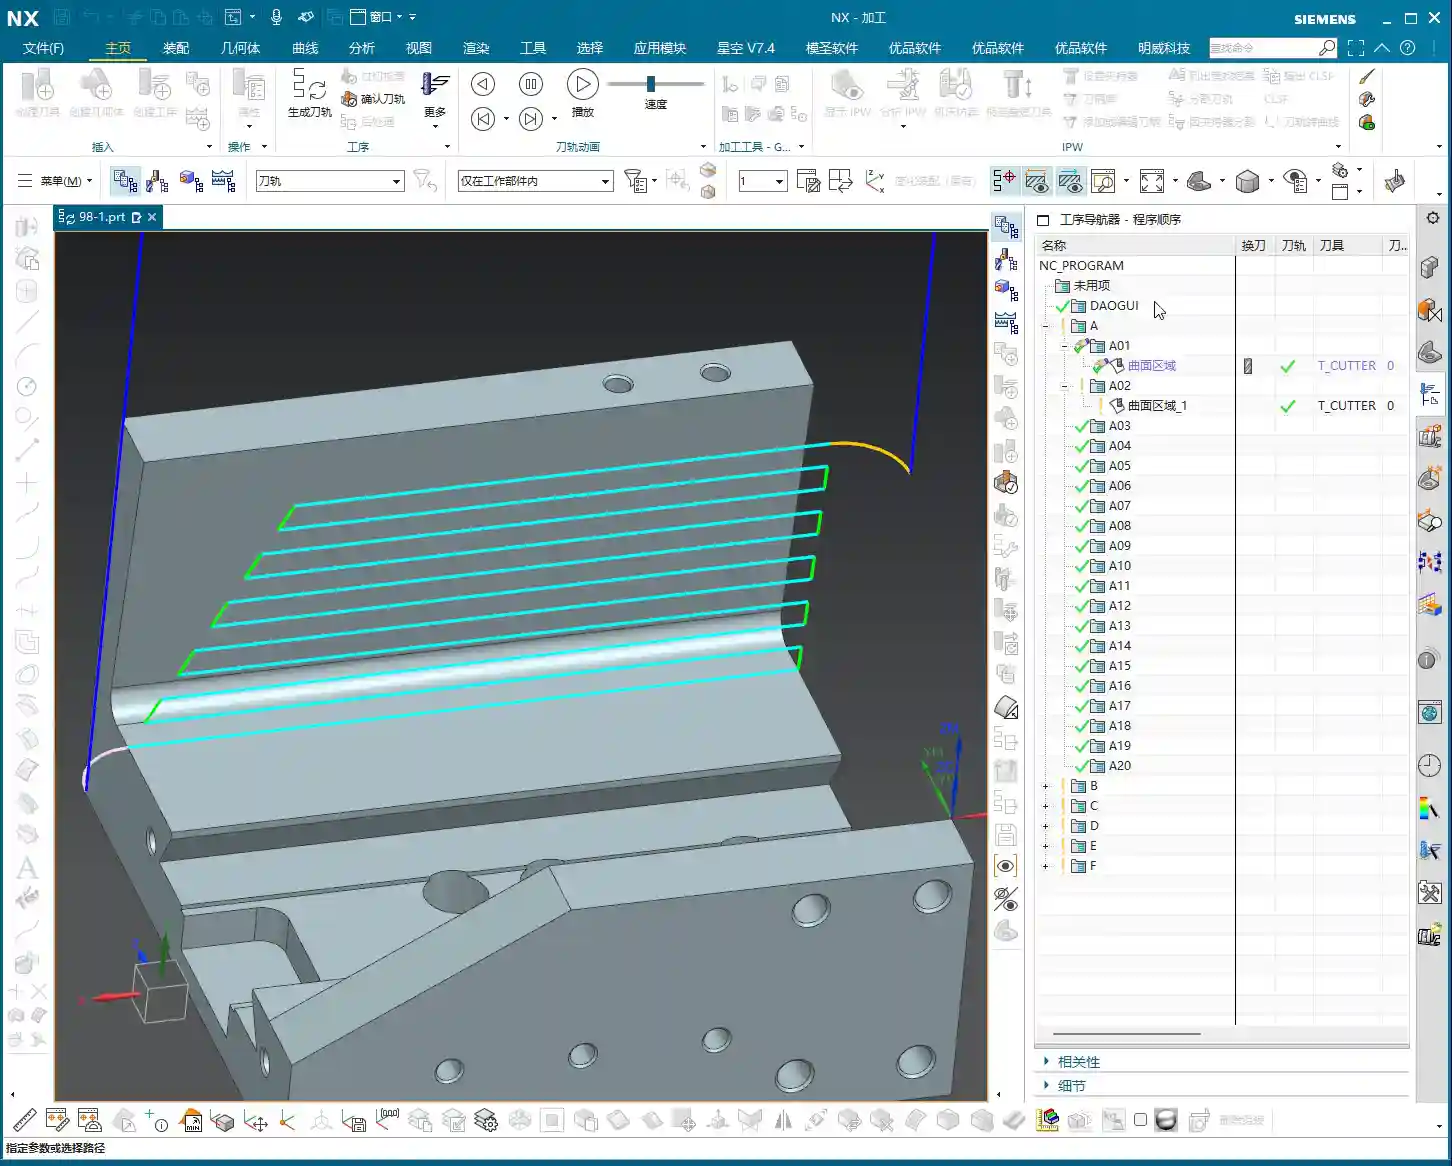
Cutting Direction: The “Compass Needle” Determining the Start Point

Before we dive into percentages, I must emphasize an absolutely critical prerequisite—the cutting direction. The cutting direction you choose directly determines where your “first start point” actually is!
For instance, if you choose to cut from left to right, then the left side is the start point. If you reverse it to cut from right to left, then the right side immediately becomes the start point. Therefore, every time you adjust the percentages, always confirm that your cutting direction is as expected. Otherwise, you might spend ages adjusting percentages, only to find the results aren’t what you envisioned—because the start point itself has changed!
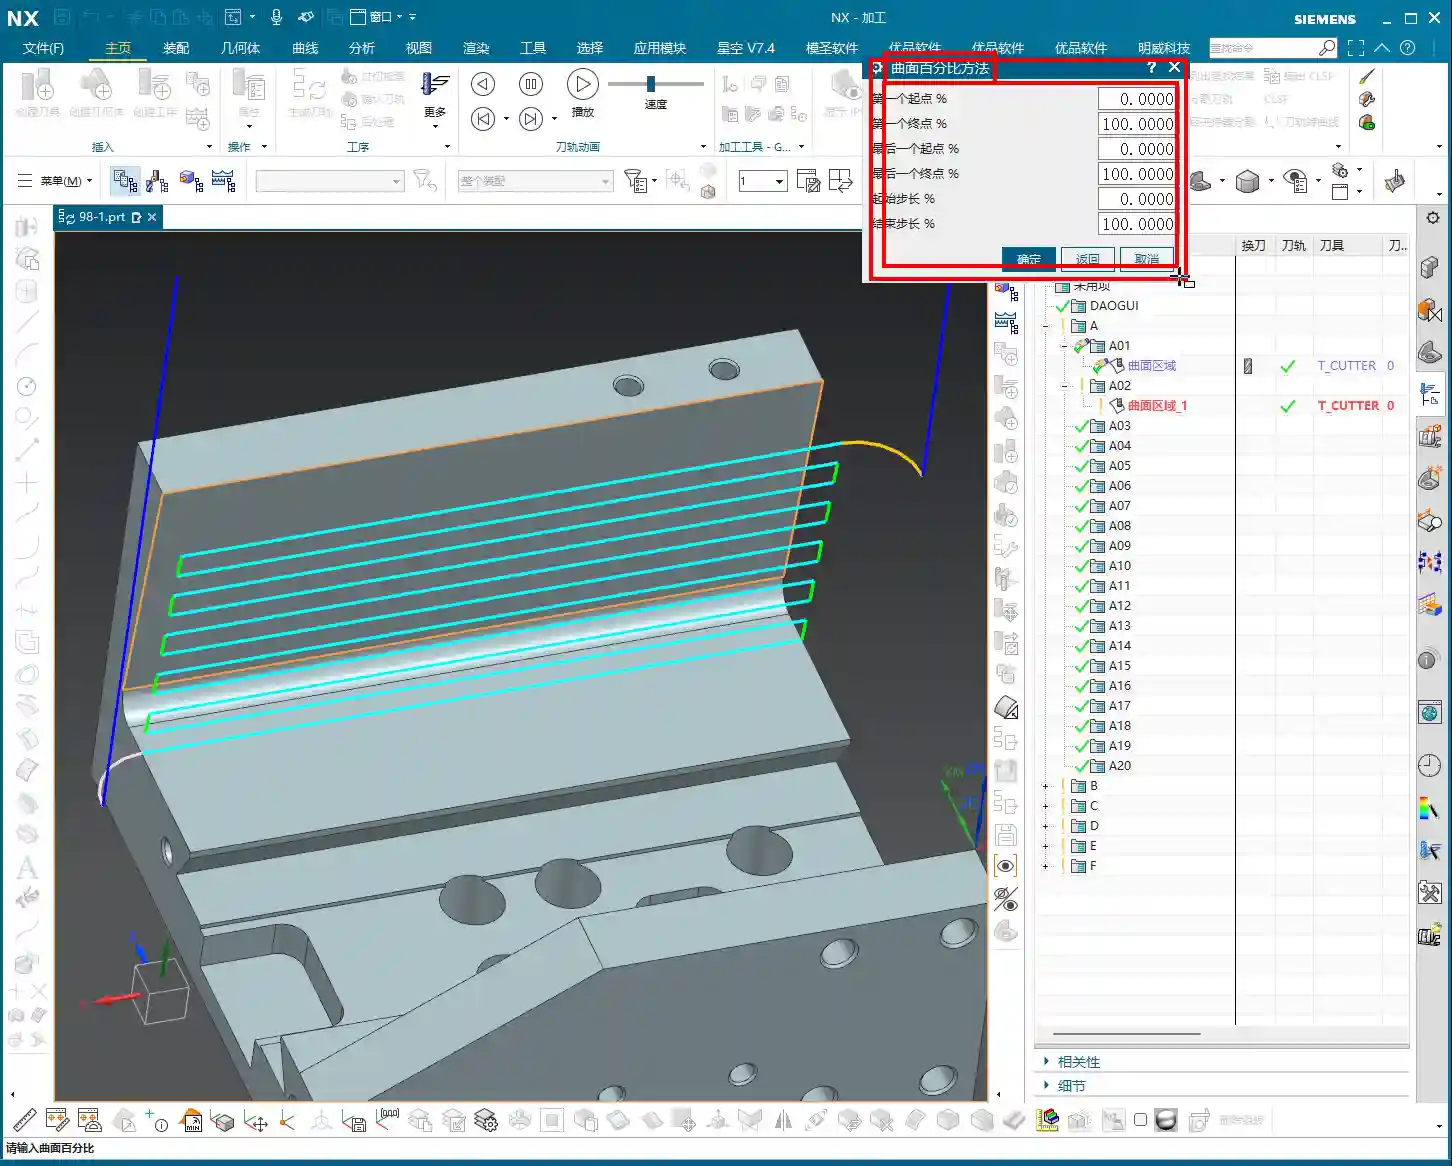
Six Key Parameters: The “Scissors” for Toolpath Length and Boundaries
Unlike “Streamline” operations, which typically only have four parameters, Surface Drive Percentage offers six parameters. These six parameters are divided into two categories: one controls the overall length of the toolpath, and the other controls the toolpath’s extension or trimming along the boundaries.
1. Toolpath Length Control:

* First Start Percentage
* The default value is 0. Setting it to 0 means starting from the beginning of your chosen cutting direction.
* If set to 20, the toolpath will start cutting 20% inward from the start point, leaving the first 20% untouched.
* If set to -10 (a negative number), the toolpath will extend outward by 10% from the start point. This is extremely useful in specific situations, such as avoiding clamping elements or allowing the tool to enter the cut in a more stable condition.
* First End Percentage
* The default value is 100. Setting it to 100 means machining along the cutting direction all the way to the end of the drive surface.
* If set to 50, the toolpath will only machine up to 50% of the total length and then stop.
* If set to 120, the toolpath will extend outward by 20% from the end point. This is particularly effective when you want the tool to completely exit the part before retracting, preventing “witness marks” at the part’s edge.
* Last Start Percentage
* This refers to the opposite end of your drive surface. The logic is the same as “First Start Percentage,” but it applies to the opposing boundary.
* Last End Percentage
* Similarly applies to the opposite end of the drive surface, following the same logic as “First End Percentage.”
**Master Wang’s Tip:** These four parameters control the overall length of the toolpath along the cutting direction. For example, if you have a long, narrow surface and only want to machine a central section, you can “trim” the toolpath by adjusting these four parameters.
2. Boundary Trimming/Extension Control:
* Start Compensation Percentage
* The default value is 0. This “Start” refers to the first side boundary of the drive surface.
* Set to 10, the toolpath will retract inward by 10% of the width from this boundary.
* Set to -10, the toolpath will extend outward by 10% of the width from this boundary. This is primarily used to ensure the tool also cuts beyond the machining boundary on the side, guaranteeing a complete cut and avoiding “steps.”
* End Compensation Percentage
* The default value is 100. This “End” refers to the second side boundary of the drive surface.
* Set to 99, the toolpath will leave 1% stock allowance at the end boundary. This is key!
* Set to 110, the toolpath will extend outward by 10% of the width from this boundary.

**Master Wang’s Tip:** These two parameters control the trimming and extension of the toolpath perpendicular to the cutting direction (or along the side boundaries). For example, if you want to leave some sidewall stock allowance on the surface edge, or allow the tool to completely overcut, you rely on these.
Leveraging Percentages: Switching Between Roughing and Finishing
Once you’re proficient with these percentages, you’ll find much greater flexibility in both roughing and finishing passes.
* **During Roughing:**
* To prevent overcutting, or to ensure sufficient stock allowance for the finishing pass, you can slightly adjust the “First Start Percentage” and “First End Percentage” to make the toolpath slightly shorter.
* More importantly, for floor stock allowance, we typically set the “End Compensation Percentage” to 99 (meaning a 1% floor stock allowance is left) or 99.5. This leaves a thin layer of material on the floor for the finishing pass to remove. Sidewall stock allowance (e.g., 0.5mm) is set elsewhere; don’t confuse the two.

* **During Finishing Pass:**
* Typically, all percentages are set to their default values (0, 100, 0, 100, 0, 100) to ensure the tool covers the entire surface.
* If edge blending or complete overcutting is needed, then “First End Percentage,” “Last End Percentage,” “Start Compensation Percentage,” and “End Compensation Percentage” can all be set appropriately to greater than 100 (e.g., 105 or 110), allowing the tool to completely cut beyond the part boundary.
* When machining difficult materials like titanium alloys or high-temperature nickel-based alloys, to reduce tool wear and improve surface quality, you can even extend slightly at the start point. This allows the tool to enter the cut in a more stable condition, avoiding impact.
Summary: Pitfall Avoidance Guide
1. Cutting Direction is King! Always confirm the cutting direction first. It determines where your “start point” is, and all percentages are calculated based on this direction. If you want the toolpath to start from a specific edge of the surface, make sure to adjust the cutting direction accordingly.
2. Distinguish “Overall” from “Boundary”:
* The first four (First Start/End, Last Start/End) control the overall length of the toolpath along the cutting direction.
* The latter two (Start Compensation, End Compensation) control the extension or trimming of the toolpath along the drive surface boundaries, especially crucial for controlling floor stock allowance.
3. Negative numbers extend, and values greater than 100 also extend: Don’t assume a negative number always means retracting; in “Start Percentage,” it means extending outward. Similarly, an End Percentage greater than 100 also means extending outward.
4. Software simulation is good, but cutting sparks are better! Don’t just rely on the toolpath simulation in the software and assume everything is fine. In actual work, observe the cutting sparks, chip shape, and the actual dimensions after machining. No matter how realistic Siemens NX’s toolpath simulation is, it cannot replace your “sharp eye” and extensive practical experience.
5. Don’t be afraid to experiment: When you’re first getting started with these settings, try different parameter combinations multiple times and observe their impact on the toolpath and machining results. Siemens NX provides powerful visualization features; test on a small scale first before applying to high-volume production.
Mastering these techniques will give you finer control over surface toolpaths in Siemens NX CAM. Whether it’s boosting machining efficiency or ensuring part accuracy, you’ll be significantly more effective. This isn’t just a technical skill; it’s an art, relying on experience and adaptability!
👤 About the Author:
The author is a veteran CNC machining professional with 15 years of industry experience, specializing in UG NX programming. This article is an original work representing personal practical insights.
⚠️ Copyright Notice: Unauthorized reproduction or distribution without prior communication is strictly prohibited.
Leave a Reply