📝 Key Takeaways: Master Wang provides a hands-on guide to the core parameter settings for NX Area Milling. From cutting strategies for steep/non-steep regions, to boundary extension techniques for improved surface quality, and check geometry settings to prevent machine collisions – these are the distilled insights from 15 years of a veteran engineer’s practical experience. Mastering these will revolutionize your machining efficiency and part accuracy, allowing you to easily avoid machining pitfalls.
Hello everyone, I’m Master Wang. Today, let’s continue our discussion on NX machining, especially focusing on critical points rarely detailed in textbooks, but which significantly impact efficiency and accuracy on the shop floor. Listen up, this is practical knowledge gained from my 15 years of hands-on experience and countless lessons learned the hard way!
Area Milling Cutting Parameters: The Secrets of Steep vs. Non-Steep Regions
When it comes to Area Milling, especially for complex surface machining, the cutting strategies for “steep areas” and “non-steep areas” in NX are crucial. Grasping these concepts will ensure your toolpaths are both fast and stable.
What are Steep and Non-Steep Regions?
Simply put, steep regions are areas with a significant incline, where a more vertical tool approach provides greater cutting stability. Conversely, non-steep regions are flatter areas, where horizontal toolpaths offer higher efficiency and better surface finish control.
In NX, this distinction is based on an angle parameter. The system automatically determines which areas are steep and which are non-steep based on your set angle, and then applies the corresponding toolpath strategy. What’s this called? It’s like “teaching according to aptitude”—using the most suitable method to tackle different regions.
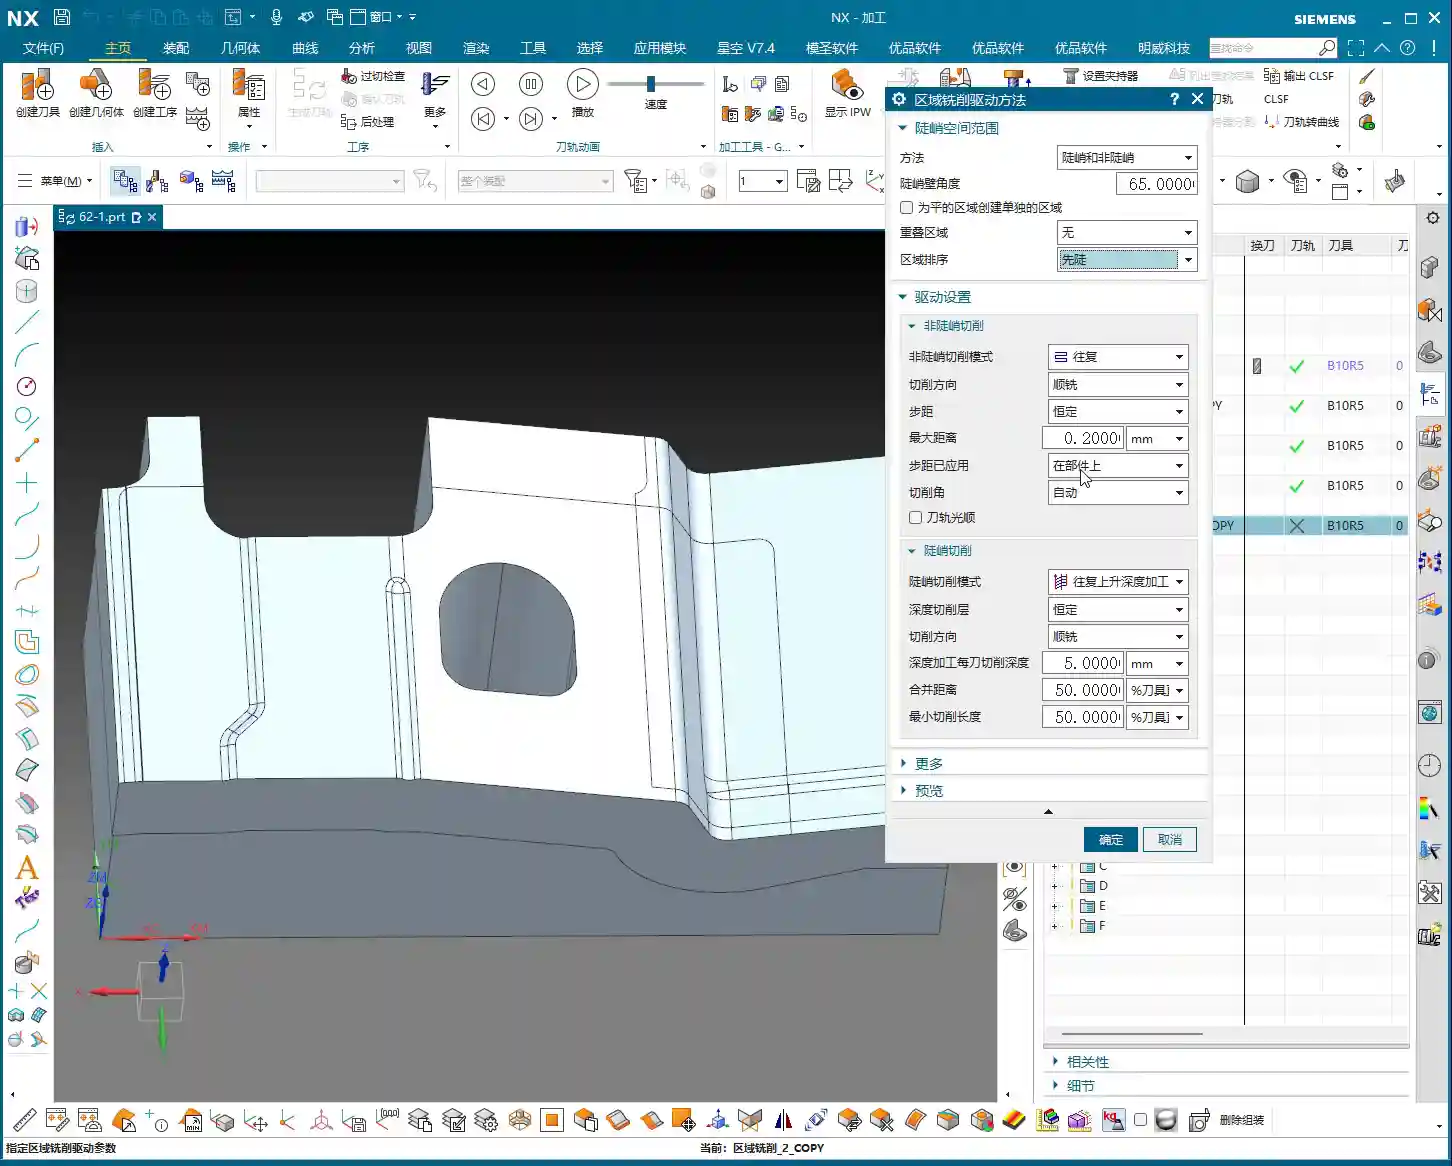

Angle Setting and Practical Application
In NX, the default angle for distinguishing steep/non-steep regions is typically 65 degrees. Most of the time, just use this default value; don’t change it arbitrarily. Why? It’s an empirically proven value, verified through extensive practical application, that suits most materials and workpiece conditions.
- Above 65 degrees: Toolpaths typically employ the “steep” strategy, with tool motion oriented more vertically, suitable for machining deep cavities, side walls, etc.
- Below 65 degrees: Toolpaths typically employ the “non-steep” strategy, with tool motion oriented more horizontally, suitable for machining flat or slightly inclined surfaces.
Of course, in some special cases, for instance, if your workpiece sidewall has a slight angle but isn’t steep enough (e.g., a small incline like 5 degrees), theoretically, you could still use the steep region strategy. But let me be frank, don’t overcomplicate things in such situations. Changing too many parameters might not even give you the desired toolpath. For such small angles, if you want a better finish, using “Depth Contour Milling” to skim the surface might be better, even if it’s a bit more involved to set up. In most cases, simply using non-steep area milling (planar machining) works just fine, and it will cover the adjacent surfaces.
So, in daily operations, when you encounter such areas, simply enable both “steep” and “non-steep” strategies simultaneously, letting the system automatically determine and switch, which is the most hassle-free and reliable approach.
The Importance of Ordering
When selecting both steep and non-steep area milling strategies, NX will also prompt you to choose a machining order. Should steep regions be machined first, or non-steep regions? Or from top-down, or bottom-up?
In my experience, I generally opt to machine steep regions first. Why? Steep regions often involve deep cavities and side walls of the workpiece. By addressing them first, you leave a clear machining space for the subsequent non-steep (flat) areas. Of course, this isn’t an absolute rule; it depends on your workpiece geometry and machining requirements. But defaulting to steep regions first is a good choice.
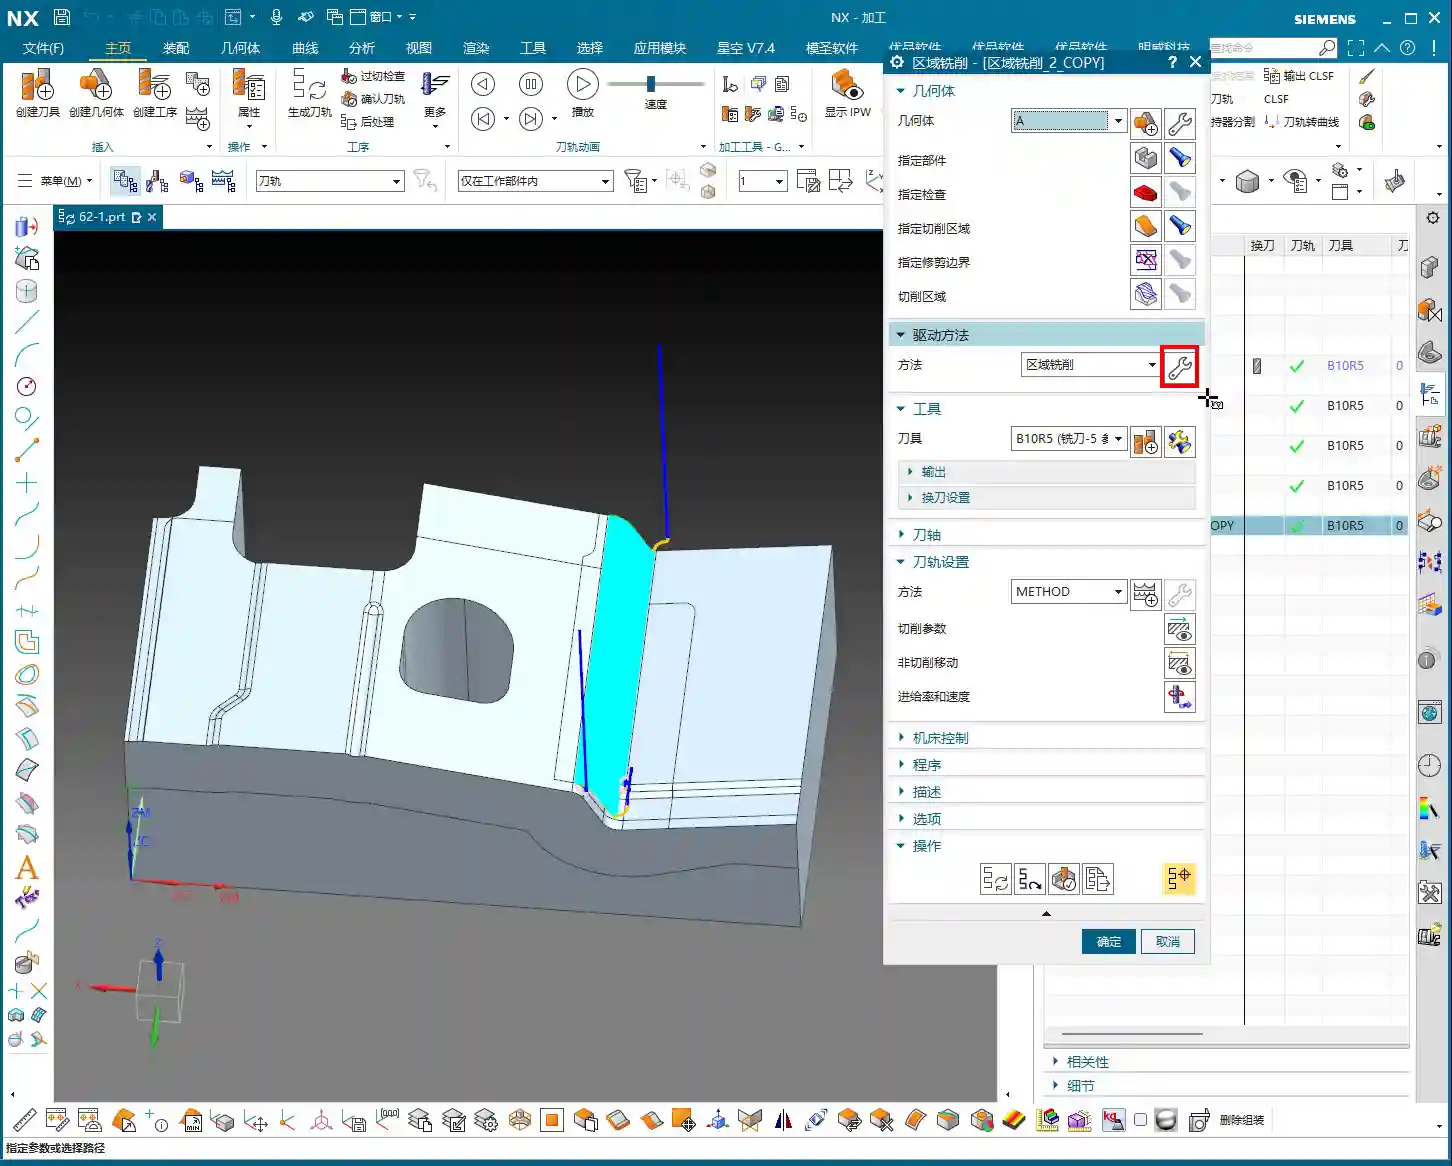
Toolpath Optimization Tool: Extend at Boundary

“Extend at Boundary” might seem insignificant, but it’s critically important, especially when striving for high surface finish in a Finishing pass. It helps you thoroughly eliminate “tool marks” at the cutting boundaries.
Why Extend?
Have you ever encountered a situation where: the tool path looked perfect in the software simulation when cutting to the workpiece edge, but the actual machined edge always had a faint mark or some burrs? This is because the tool didn’t “fully exit the cut.”
When you enable and set “Extend at Boundary,” the toolpath won’t stop exactly at the model’s edge; instead, it will extend a small distance beyond. This allows the tool to completely exit the workpiece, leaving the edge cleanly machined, preventing the tool from “compressing” or “dragging” material at the boundary. It’s like cutting paper with scissors – you always cut a little beyond the line to ensure a clean edge.
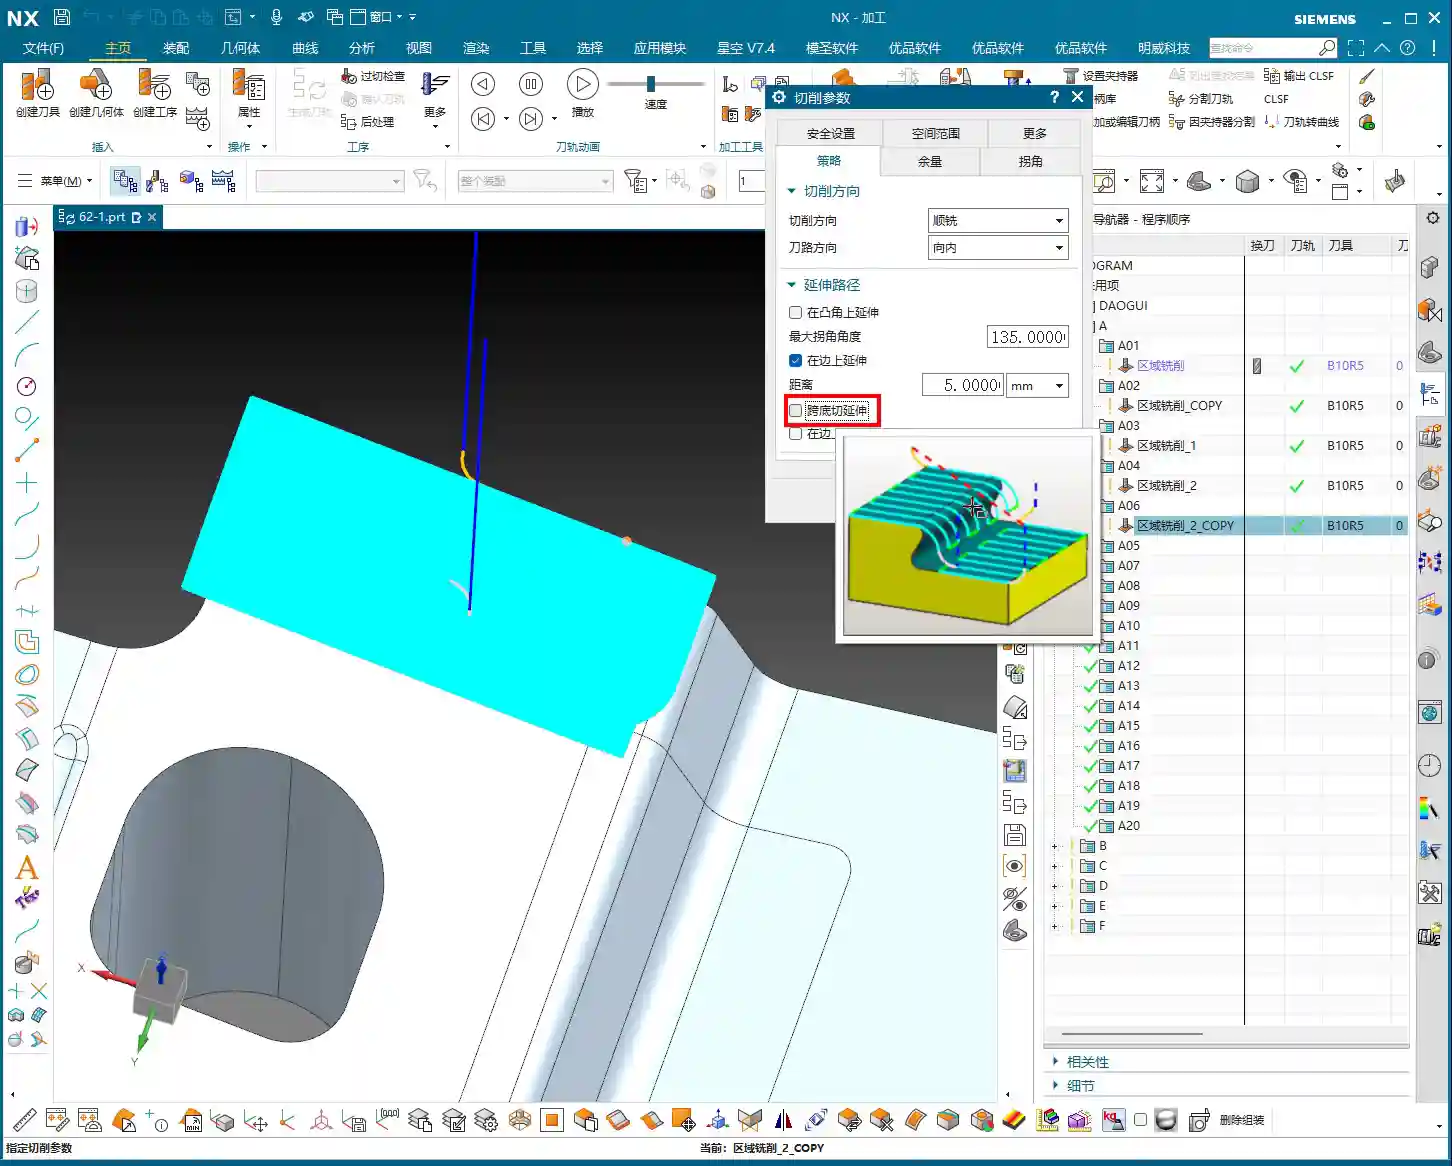
What is the Appropriate Extension Amount?
The extension distance is generally recommended to be set between 0.5 to 2 mm (approx. 0.02-0.08 inch). The specific value depends on your tool diameter and material. For small diameter tools, such as a Φ6 mm (approx. 0.236 inch) ball end mill, an extension of 0.5-1 mm (approx. 0.02-0.04 inch) is usually sufficient. For larger tools or stickier materials, 1-2 mm (approx. 0.04-0.08 inch) extension will be more reliable. When I adjust this parameter to 1 mm or 2 mm, you can clearly see the toolpath extend, and the surface quality immediately improves. Unlike the four-sided extension in “Depth Contour Milling”, this “Extend at Boundary” is primarily for managing tool entry and exit at workpiece boundaries, aiming for perfect edges. Remember, sometimes details determine success. Get these small things right, and your customer will be satisfied.

Avoiding Obstacles, Efficient Machining: Check Geometry (Skip and Retract)
This section is of paramount importance! In actual machining, the biggest fear is the tool colliding with fixtures, clamps, or protrusions on the workpiece. NX’s “Check Geometry” function, particularly the “Skip” and “Retract” options, directly impacts your machine and tool safety, as well as machining efficiency.
What to do when a clamp appears? Retract vs. Skip
Imagine your tool happily cutting, then suddenly a clamping plate blocks its path. How should the system handle this?
- Retract: This is NX’s default setting and the safest strategy. When the tool encounters an obstacle, it will automatically lift, bypass the obstacle, and then re-engage to continue machining. The entire process is: Lift → Traverse → Re-engage. While safe, the drawback is increased retraction cycles, extending machining time, and potentially leaving slight marks where the tool lifts and re-engages, though often not prominent.
- Skip: If you select “Skip,” the system assumes the obstacle poses no threat (e.g., it’s very low, or the tool can pass over it without issue). The tool will directly traverse over the obstacle without retracting. The entire process is: Traverse. This method is highly efficient, saving retraction and re-engagement time, and resulting in a smoother toolpath.
Here’s the key point: NX’s “Skip” function typically has a “safety distance” or “skip clearance,” for example, a default of 3 mm (approx. 0.118 inch). This means if the obstacle’s height is within 3 mm above the tool’s current position, it will opt to skip. Beyond this range, it will default back to retract. Of course, this value can be adjusted.
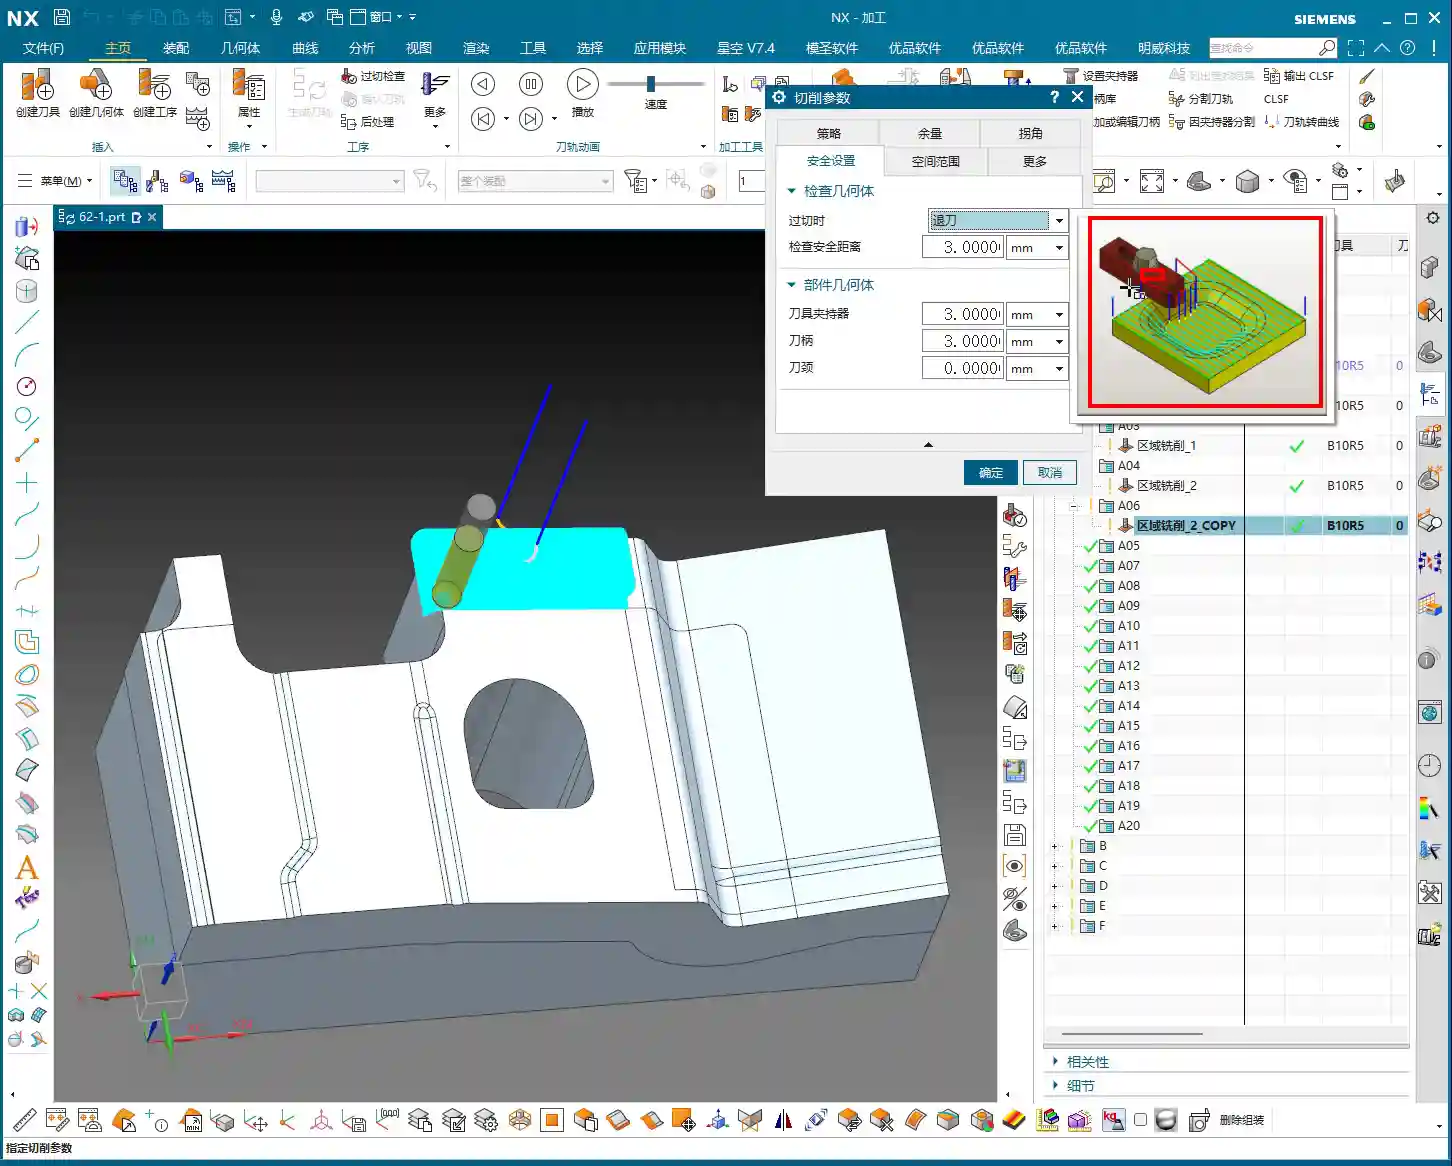
Master Wang’s Advice: The default “Retract” strategy is the safest. Especially for beginners, absolutely do not change it arbitrarily. Only consider using “Skip” to improve efficiency when you are 100% certain that the clamp or obstacle is low enough and the tool will absolutely not make contact. Don’t just rely on software simulations; no matter how good they look, a tool crash on the actual machine is no joke – it can range from scrapping the workpiece to damaging the machine. I often say, “Don’t just look at the software simulation; look at the cutting sparks,” and that’s exactly what I mean. Practical operational experience and thorough inspection are paramount.

Risks and Benefits of Skipping
Risks: If you misjudge the obstacle’s height, or if the fixture isn’t precisely modeled, the tool will collide when “skipping,” leading to tool breakage or even machine damage. Such losses far outweigh the small amount of machining time you might save.
Benefits: In certain specific situations, such as using very short tools, or when obstacles (like a pre-machined boss on the workpiece) are genuinely low, or if you’re using a 5-axis machine that can cleverly avoid obstacles, then “Skip” can significantly boost machining efficiency and reduce air cutting time. Especially in high-volume production, these small efficiency gains accumulate into a substantial cost advantage. Therefore, understanding when to use “Skip” and when to use “Retract” is a crucial skill for any qualified NX programmer.
Roll Tool on Boundary? Mostly Unnecessary
Additionally, NX has an option called “Roll Tool on Boundary.” In essence, this function makes the tool “roll” an extra pass when it encounters an edge. But in my experience, this feature is largely useless. It just causes your tool to make an extra cut, increasing unnecessary machining time with minimal improvement to surface quality. Therefore, I recommend you keep it unchecked by default, unless you have a very specific requirement.
Summary: Pitfall Avoidance Guide
- Steep/Non-Steep Region Division: Most of the time, the default 65-degree division angle is sufficient. It’s best to enable both strategies simultaneously, allowing the system to switch automatically.
- Toolpath Ordering: Prioritize machining steep regions first, then process flatter surfaces to maintain a smooth machining flow.
- Extend at Boundary: This is a powerful tool for improving surface finish. Always enable it and set a reasonable extension amount (0.5-2 mm). It effectively prevents edge marks and burrs.
- Check Geometry (Skip/Retract): The default “Retract” is the safest. Only consider using “Skip” to increase efficiency when you are 100% certain of safety (e.g., obstacles are very low and have been cleared). Otherwise, it’s better to go slower and ensure foolproof operation. Remember, safety first, efficiency second.
- Other Infrequently Used Functions: For instance, “Roll Tool on Boundary” should generally be left unchecked by default, unless there’s a special circumstance.
Practice and review these parameters frequently. Especially after generating toolpaths, always simulate extensively and critically analyze. Behind every parameter lies a connection to the actual cutting process and potential issues. By constantly asking “why,” you can truly grow from a programmer into a skilled “Machining Master”!
👤 About the Author:
The author is a veteran CNC machining professional with 15 years of industry experience, specializing in UG NX programming. This article is an original work representing personal practical insights.
⚠️ Copyright Notice: Unauthorized reproduction or distribution without prior communication is strictly prohibited.
Leave a Reply